Showing posts with label Docker. Show all posts

27 Jan 2019

Monitoring an ADF Application in a Docker Container. Easy Way.

In this short post I am going to show a simple approach to make sure that your ADF application running inside a Docker container is a healthy Java application in terms of memory utilization. I am going to use a standard tool JConsole which comes as a part of JDK installation on your computer. If there is a problem (i.e. a memory leak,  often GCs, long GCs, etc.) you will see it with JConsole. In an effort to analyze the root of the problem and find the solution you might want to use more powerful and fancy tools. I will discuss that in one of my following posts. A story of tuning JVM for an ADF application is available here.

So there is an ADF application running on top of Tomcat. The application and the Tomcat are packaged into a Docker container running on dkrlp01.flexagon host. There are some slides on running an ADF application in a Docker container.
In order to connect with JConsole from my laptop to a JVM running inside the container, we need to add the following JVM arguments in tomcat/bin/setenv.sh:
 -Dcom.sun.management.jmxremote=true
 -Dcom.sun.management.jmxremote.rmi.port=9010
 -Dcom.sun.management.jmxremote.port=9010
 -Dcom.sun.management.jmxremote.ssl=false
 -Dcom.sun.management.jmxremote.authenticate=false
 -Dcom.sun.management.jmxremote.local.only=false
 -Djava.rmi.server.hostname=dkrlp01.flexagon

Besides that the container has to expose port 9010, so it should be created with
"docker run -p 9010:9010 ..." command.

Having done that we can invoke jconsole command locally and connect to the container:


Now just give the application some load with you favorite testing tool (JMeter, OATS, SOAP UI, Selenium, etc..) and observe the memory utilization:


That's it!


24 Nov 2018

Persistent Volumes for Database Containers running on a K8s cluster in the Cloud

In one of my previous posts I showed how we can run Oracle XE database on a K8s cluster. That approach works fine for the use-cases when we don't care about the data and we are fine with loosing it when the container is redeployed and the pod is restarted. But if we want to keep the data, if we want it to survive all rescheduling we'll want to reconsider K8s resources used to run the DB container on the cluster. That said, the yaml file defining the resources looks like this one:

apiVersion: apps/v1beta2
kind: StatefulSet
metadata:
  name: oraclexe
  labels:
    run: oraclexe
spec:
  selector:
      matchLabels:
        run: oraclexe
  serviceName: "oraclexe-svc"
  replicas: 1
  template:
    metadata:
      labels:
        run: oraclexe
    spec:
      volumes:
       - name: dshm
         emptyDir:
           medium: Memory  
      containers:
      - image: eugeneflexagon/database:11.2.0.2-xe
        volumeMounts:
           - mountPath: /dev/shm
             name: dshm
           - mountPath: /u01/app/oracle/oradata
             name: db
        imagePullPolicy: Always
        name: oraclexe
        ports:
        - containerPort: 1521
          protocol: TCP
  volumeClaimTemplates:
   - metadata:
       name: db
     spec:
       accessModes: [ "ReadWriteOnce" ]
       resources:
         requests:
           storage: 100M                   
---
apiVersion: v1
kind: Service
metadata:
  name: oraclexe-svc
  labels:
    run: oraclexe   
spec:
  selector:
    run: oraclexe
  ports:
    - port: 1521
      targetPort: 1521
  type: LoadBalancer

There are some interesting things here. First of all this is not a deployment. We are defining here another K8s resource which is called Stateful Set. Unlike a Deployment, a Stateful Set maintains a sticky identity for each of their Pods. These pods are created from the same specification, but they are not interchangeable: each has a persistent identifier that it maintains across any rescheduling.

This guy has been specially designed for stateful applications like database that save their data to a persistent storage. In order to define a persistent storage for our database we use a special K8s resource Persistent Volume and here in the yaml file we are defining a claim to create a 100mb Persistent Volume with name db. This volume provides read/write access mode for one assigned pod. The volume is called persistent because its lifespan is not maintained by a container and not even by a pod, it’s maintained by a K8s cluster. So it can outlive any containers and pods and save the data. We are referring to this persistence volume in the container definition mounting a volume on path /u01/app/oracle/oradata. This is where Oracle DB XE container stores its data.

That's it!

29 Sept 2018

Configuring a Datasource in a Docker Container

In this post I am going to show how to configure a datasource consumed by an ADF application running on Tomcat in a Docker container.


So, there is a Docker container sample-adf with a Tomcat application server preconfigured with ADF libraries and with an ADF application running on top of Tomcat. The ADF application requires a connection to an external database.
The application is implemented with ADF BC and it's application module is referring to a datasource jdbc/appDS.


This datasource is configured inside a container in Tomcat /conf/context.xml file. The JDBC url, username and password are provided by environment variables:

<Resource name="jdbc/appDS" auth="Container"
           type="oracle.jdbc.pool.OracleDataSource"
           factory="oracle.jdbc.pool.OracleDataSourceFactory"
           url="${DB_URL}"
           user="${DB_USERNAME}"
           password="${DB_PWD}"

           ...


These variables are propagated to the application server in Tomcat /bin/setenv.sh file:

CATALINA_OPTS='-DDB_URL=$DB_URL -DDB_USERNAME=$DB_USERNAME -DDB_PWD=DB_PWD ...'

Having these configurations set, we can run a container providing values of the variables:

docker run --name adf -e DB_URL="jdbc:oracle:thin:@myhost:1521:xe" -e DB_USERNAME=system -e DB_PWD=welcome1 sample-adf

If we are about to run a container in a K8s cluster we can provide variable values in a yaml file:

spec:
      containers:
      - image: sample-adf
        env:
        - name: DB_URL
           value: "jdbc:oracle:thin:@myhost:1521:xe"
        - name: DB_USERNAME
          value: "system"
        - name: DB_PWD
          value: "welcome1"


In order to make this yaml file portable we would avoid providing exact values and refer to K8s ConfigMaps and Secrets instead of that

A ConfigMap is a named K8s resource that allows us to decouple configuration artifacts from image content to keep containerized applications portable. This is just a simple set of key-value paires. And obviously those values in each K8s cluster, in each environment are different.

Similar approach is used when it comes to sensitive data like user names and passwords. Only in this case instead of configmaps we use a special resource which is called Secret. The data is encoded and it is only sent to a node if a pod on that node requires it. It is deleted once the pod that depends on it is deleted.

We can create ConfigMaps and Secrets out of key-value files or just by providing the values in a command line:

kubectl create configmap adf-config  
--from-literal=db.url="jdbc:oracle:thin:@myhost:1521:xe"

kubectl create secret generic adf-secret 
--from-literal=db.username="system
--from-literal=db.pwd="welcome1"


Having done that we can specify in the yaml file that values for the environment variables should be fetched from adf-config ConfigMap and adf-secret Secret:

spec:
      containers:
      - image: sample-adf
        env:
        - name: DB_URL
          valueFrom:
               configMapKeyRef:
                   name: adf-config
                   key: db.url
        - name: DB_USERNAME
          valueFrom:
               secretKeyRef:
                   name: adf-secret
                   key: db.username
        - name: DB_PWD
          valueFrom:
               secretKeyRef:
                   name: adf-secret
                   key: db.pwd


That's it!

30 Jul 2018

Run Oracle XE Docker Container on Amazon EKS

Recently Amazon announced general availability of their new service Amazon Elastic Container Service for Kubernetes (Amazon EKS). This is a managed service to deploy, manage and scale containerized applications using K8s on AWS. I decided to get my hands dirty with it and deployed a Docker container with Oracle XE Database to a K8s cluster on Amazon EKS. In this post I am going to describe what I did to make that happen.

1. Create Oracle XE Docker image.

First of all we need a Docker image with Oracle XE database:

1.1 Clone Oracle GitHub repository to build docker images:
git clone https://github.com/oracle/docker-images.git oracle-docker-images

It will create oracle-docker-images folder.

1.2 Download Oracle XE binaries from OTN

1.3 Copy the downloaded stuff to ../oracle-docker-images/OracleDatabase/SingleInstance/dockerfiles/11.2.0.2 folder

1.4 Build the Docker image
./buildDockerImage.sh -v 11.2.0.2 -x -I

1.5 Check the new image

docker images oracle/database:11.2.0.2-xe
1.6. Rename the image so you can push it to Docker Hub. E.g.:
docker tag oracle/database:11.2.0.2-xe eugeneflexagon/database:11.2.0.2-xe

Ok, so having done that, we have Oracle XE Docker image stored in Docker Hub repository.

2. Create K8s cluster on Amazon EKS.

Assuming that you have already AWS account, take your favorite tambourine (you will need it) and create a K8s cluster following this guide Getting Started with Amazon EKS (a good example of how complicated you can make a "getting started guide").

Once you are able to see your working nodes in Ready status, you're good to move forward
kubectl get nodes --watch
3. Configure Load Balancer

In AWS console go to your EC2 Dashboard and look at the Load Balancers tab:


Click on Create Load Balancer, select Network Load Balancer:


change the listener port to 1521


and specify in Availability Zones the VPC that you have just created for the K8s cluster:

The scheme should be internet-facing.

4.
Deploy Oracle XE Docker container to the K8s cluster.

4.1 Create a yaml file with the following content:
apiVersion: extensions/v1beta1
kind: Deployment
metadata:
  name: oraclexe
  labels:
    run: oraclexe
spec:
  replicas: 1
  strategy:
    rollingUpdate:
      maxSurge: 1
      maxUnavailable: 1
    type: RollingUpdate
  template:
    metadata:
      labels:
        run: oraclexe
    spec:   
     volumes:
       - name: dshm
         emptyDir:
           medium: Memory
     containers:
       - image: eugeneflexagon/database:11.2.0.2-xe
         volumeMounts:
           - mountPath: /dev/shm
             name: dshm
         imagePullPolicy: Always
         name: oraclexe
         ports:
           - containerPort: 1521
             protocol: TCP
     imagePullSecrets:
       - name: wrelease
     restartPolicy: Always
---
apiVersion: v1
kind: Service
metadata:
  name: oraclexe-svc
spec:
  selector:
    run: oraclexe
  ports:
    - port: 1521
      targetPort: 1521
  type: LoadBalancer

4.2  Deploy it:
kubectl apply -f oraclexe-deployment.yaml

5. Check how it works

5.1. Get a list of pods and check the logs:
kubectl get pods

kubectl logs -f POD_NAME


Once you see in the logs DATABASE IS READY TO USE! the database container is up and running.

Note, that the container while starting generated a password for sys and system users. You can find this password in the log:


5.2 Get external IP address of the service:
kubectl get svc

Wait until the address in EXTERNAL-IP column turns from PENDING into something meaningful:


5.3 Connect to the DB:

That's it!

28 Apr 2018

Building Oracle Jet applications with Docker Hub

In this post I am going to show a simple CI solution for an Oracle Jet application basing on Docker Hub Automated Builds feature. The solution is container native meaning that Docker Hub is going to automatically build a Docker image according to a Docker file. The image is going to be stored in Docker Hub registry. A Docker file is a set of instructions on how to build a Docker image and those instructions may contain any actions including building an Oracle Jet application. So, what we need to do is to create a proper Docker file and set up Docker Hub Automated Build.
I am going to build an Oracle Jet application with OJet CLI, so I have created a Docker image having OJet CLI installed and serving as an actual builder. The image is built with the following Dockerfile:

FROM node
RUN npm install -g @oracle/ojet-cli

By running this command:
docker built -t eugeneflexagon/ojetbuilder .

Having done that we can use this builder image in a Dockerfile to build our Jet application:
# Create an image from a "builder" Docker image
FROM eugeneflexagon/ojetbuilder

# Copy all sources inside the new image
COPY . .

# Build the appliaction. As a result this will produce web folder.
RUN ojet build


# Create another Docker image which runs Jet application
# It contains Nginx on top of Alpine and our Jet appliction (web folder)
# This image is the result of the build and it is going to be stored in Docker Hub
FROM nginx:1.10.2-alpine
COPY --from=0 web /usr/share/nginx/html
EXPOSE 80

Here we are using the multi-stage build Docker feature when we actually create two Docker images: one for building and one for running, and only the last one is going to be saved as the final image. So, I added this Docker file to my source code on GitHub.

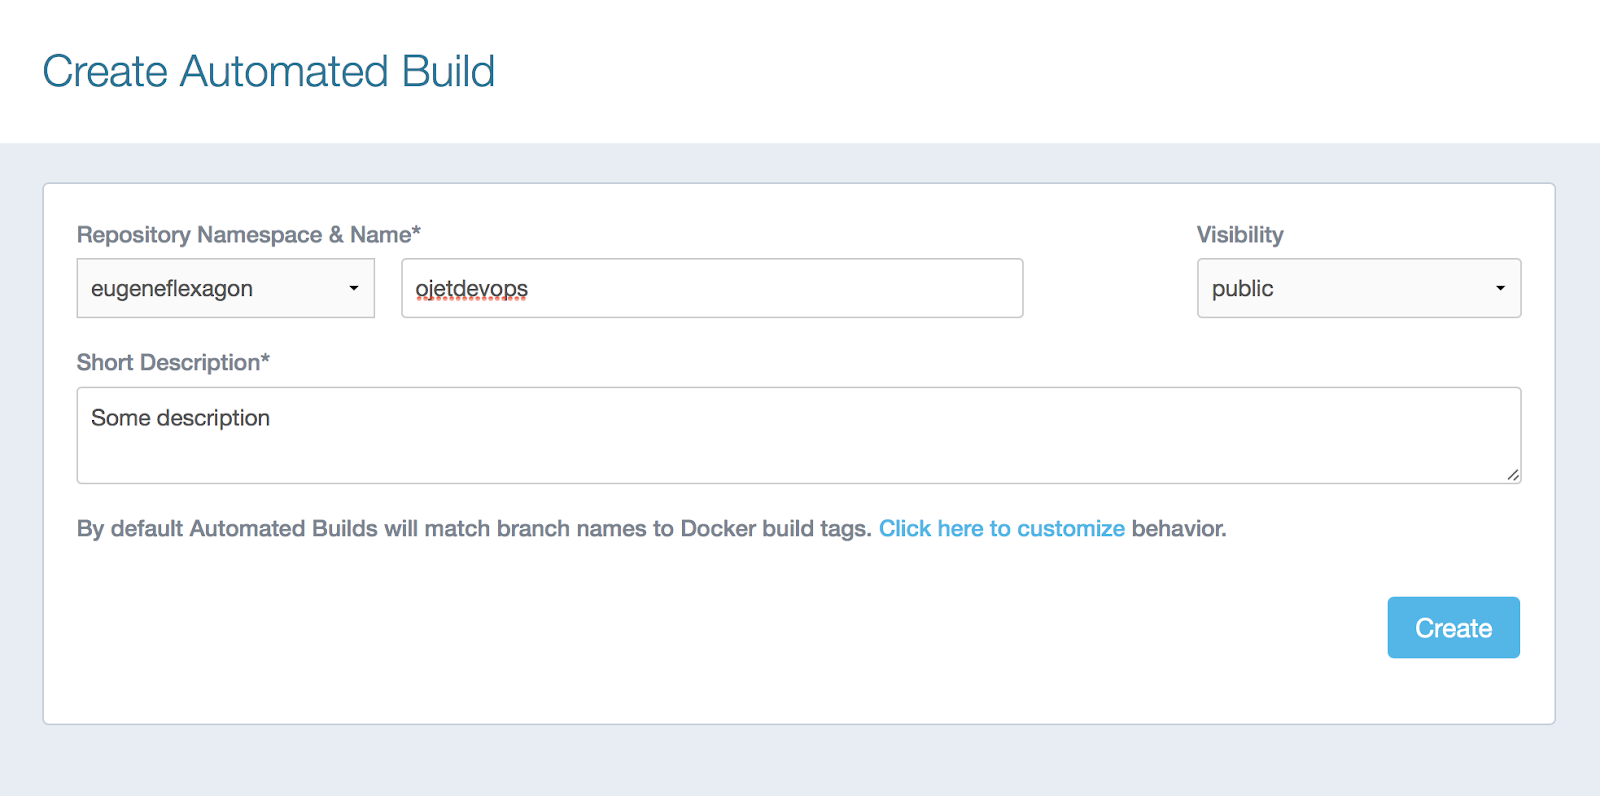
The next step is to configure Docker Hub Automated Build:


That was easy. Now we can change the source code and once it is pushed to GutHub the build is automatically queued:


Once the build is finished we can pull and run the container locally:


docker run -it -p 8082:80 eugeneflexagon/ojetdevops:latest

And see the result at http://localhost:8082


That's it!

31 Mar 2018

Deploying to K8s cluster with Fn Function

An essential step of any CI/CD pipeline is deployment. If the pipeline operates with Docker containers and deploys to K8s clusters then the goal of the deployment step is to deploy a specific Docker image (stored on some container registry) to a specific K8s cluster.  Let's say there is a VM where this deployment step is being performed. There are a couple of things to be done with that VM before it can be used as a deploying-to-kuberenetes machine:
  • install kubectl (K8s CLI) 
  • configure access to K8s clusters where we are going to deploy 
Having the VM configured, the deployment step does the following:
# kubeconfig file contains access configuration to all K8s clusters we need
# each configuration is called "context"
export KUBECONFIG=kubeconfig

# switch to "google-cloud-k8s-dev" context (K8s cluster on Google Cloud for Dev)
# so all subsequent kubectl commands are applied to that K8s cluster
kubectl config  use-context google-cloud-k8s-dev

# actually deploy by applying k8s-deployment.yaml file
# containing instructions on what image should be deployed and how  
kubectl apply -f k8s-deployment.yaml

In this post I am going to show how we can create a preconfigured Docker container capable of deploying a Docker image to a K8s cluster. So, basically, it is going to work as a function with two parameters: docker image, K8s context. Therefore we are going to create a function in Fn Project basing on this "deployer" container and deploy to K8s just by invoking the function over http.

The deployer container is going to be built from a Dockerfile with the following content:
FROM ubuntu

# install kubectl
ADD https://storage.googleapis.com/kubernetes-release/release/v1.6.4/bin/linux/amd64/kubectl /usr/local/bin/kubectl
ENV HOME=/config
RUN chmod +x /usr/local/bin/kubectl
RUN export PATH=$PATH:/usr/local/bin

# install rpl
RUN apt-get update
RUN apt-get install rpl -y

# copy into container k8s configuration file with access to all K8s clusters
COPY kubeconfig kubeconfig

# copy into container yaml file template with IMAGE_NAME placeholder
# and an instruction on how to deploy the container to K8s cluster
COPY k8s-deployment.yaml k8s-deployment.yaml

# copy into container a shell script performing the deployment
COPY deploy.sh /usr/local/bin/deploy.sh
RUN chmod +x /usr/local/bin/deploy.sh

ENTRYPOINT ["xargs","/usr/local/bin/deploy.sh"]

It is worth looking at the k8s-deployment.yaml file. It contains IMAGE_NAME placeholder which is going to be replaced with the exact Docker image name while deployment:

apiVersion: extensions/v1beta1
kind: Deployment

...

    spec:
      containers:
      - image: IMAGE_NAME
        imagePullPolicy: Always
...

The deploy.sh script which is being invoked once the container is started has the following content:
#!/bin/bash

# replace IMAGE_NAME placeholder in yaml file with the first shell parameter 
rpl IMAGE_NAME $1 k8s-deployment.yaml

export KUBECONFIG=kubeconfig

# switch to K8s context specified in the second shell parameter
kubectl config  use-context $2

# deploy to K8s cluster
kubectl apply -f k8s-deployment.yaml

So, we are going to build a docker image from the Dockerfile by invoking this docker command:
docker build -t efedorenko/k8sdeployer:1.0 .
Assuming there is Fn Project up and running somewhere (e.g. on K8s cluster as it is described in this post) we can create an Fn application:
fn apps create k8sdeployerapp
Then create a route to the k8sdeployer container:
fn routes create k8sdeployerapp /deploy efedorenko/k8sdeployer:1.0
We have created a function deploying a Docker image to a K8s cluster. This function can be invoked over http like this:
curl http://35.225.120.28:80/r/k8sdeployer -d "google-cloud-k8s-dev efedorenko/happyeaster:latest"
This call will deploy efedorenko/happyeaster:latest Docker image to a K8s cluster on Google Cloud Platform.


That's it!


26 Feb 2018

Running Tomcat and Oracle DB in a Docker container

In one of my previous posts I showed how to run an ADF essentials application on Tomcat in a docker container. I am using this approach primarily for sample applications as a convenient way to share a proof-of-concept. In this post I am going to describe how to enrich the docker container with Oracle DB so my samples can be DB aware.

The original Tomcat image that I am developing in these posts is based on Debian Linux. I really don't want to have fun with installing and configuring Oracle DB on Debian Linux, and, for sure, I am not going to describe that in this post. What I am going to do is to use Docker-in-Docker technique. So, I am going to take the container from the previous post with ADF-preconfigured Tomcat, install Docker runtime in that container, pull Oracle DB image and run it inside the container. There are plenty of discussions about the Docker-in-Docker technique arguing if it is effective enough or not. I think I wouldn't go with this approach in production, but for sample applications I am totally fine with it.

Let's start.

1. Run a new container from the image saved in the previous post:
docker run --privileged -it -p 8888:8080 -p 1521:1521 -p 5500:5500 --name adftomcatdb efedorenko/adftomcat bash

Mind the option privileged in the docker command. This option is needed to make the container able  to run Docker engine inside itself.

2.  Install Docker engine in the container:
curl -fsSL get.docker.com -o get-docker.sh

sh get-docker.sh
After successful installation Docker engine should start automatically. It can be checked by running a simple docker command:
docker ps
If the engine has not started (as it happened in my case), start it manually:
service docker start
3. Login to Docker Hub:
docker login
And provide your Docker Hub credentials.

4. Pull and run official Oracle DB Image:
docker run --detach=true --name ADFDB -p 1521:1521 -p 5500:5500  store/oracle/database-enterprise:12.2.0.1

It's done!

Now we have a docker container with preconfigured Tomcat to run ADF applications and with Oracle DB running in a container inside the container. We can connect to the DB from both adftomcatdb container and the host machine as sys/Oradoc_db1@127.0.0.1:1521:ORCLDB as sysdba

Let's save our work to a docker image, so that we can reuse it later.

5. Create a start up shell script /user/local/tomcat/start.sh in the container with the following content:
#!/bin/bash
service docker start
docker start ADFDB
catalina.sh start
exec "$@"
6. Remove Docker runtimes folder in the container:
rm -r /var/lib/docker/runtimes/
7. Stop the container from the host terminal:
 docker stop adftomcatdb
8. Create a new image:
docker commit adftomcatdb efedorenko/adftomcatdb:1.0
9. Run a new container out of the created image:
docker run --privileged -it -p 8888:8080 -p 1521:1521 -p 5500:5500 --name adftomcatdb_10 efedorenko/adftomcatdb:1.0 ./start.sh bash
10. Enjoy!


That's it!

31 Jan 2018

Fn Function to build an Oracle ADF application

In one of my previous posts I described how to create a Docker container serving as a builder machine for ADF applications. Here I am going to show how to use this container as a function on Fn platform.

First of all let's update the container so that it meets requirements of a function, meaning that it can be invoked as a runnable binary accepting some arguments. In an empty folder I have created a Dockerfile (just a simple text file with this name) with the following content:

FROM efedorenko/adfbuilder
ENTRYPOINT ["xargs","mvn","package","-DoracleHome=/opt/Oracle_Home","-f"]

This file contains instructions for Docker on how to create a new Docker image out of existing one (efedorenko/adfbuilder from the previous post) and specifies an entry point, so that a container knows what to do once it has been initiated by the Docker run command. In this case whenever we run a container it executes Maven package goal for the pom file with the name fetched from stdin. This is important as Fn platform uses stdin/stdout for functions input/output as a standard approach.

In the same folder let's execute a command to build a new Docker image (fn_adfbuilder) out of our Docker file:

docker build -t efedorenko/fn_adfbuilder .

Now, if we run the container passing pom file name through stdin like this:

echo -n "/opt/MySampleApp/pom.xml" | docker run -i --rm efedorenko/fn_adfbuilder

The container will execute inside itself what we actually need:

mvn package -DoracleHome=/opt/Oracle_Home -f /opt/MySampleApp/pom.xml

Basically, having done that, we got a container acting as a function. It builds an application for the given pom file.

Let's use this function in Fn platform. The installation of Fn on your local machine is as easy as invoking a single command and described on GitHub Fn project page.  Once Fn is installed we can specify Docker registry where we store images of our functions-containers and start Fn server:

export FN_REGISTRY=efedorenko 
fn start

The next step is to create an Fn application which is going to use our awesome function:

fn apps create adfbuilderapp

For this newly created app we have to specify a route to our function-confiner, so that the application knows when and how to invoke it:

fn routes create --memory 1024 --timeout 3600 --type async adfbuilderapp /build efedorenko/fn_adfbuilder:latest

We have created a route saying that whenever /build resource is requested for adfbuilderapp, Fn platform should create a new Docker container basing on the latest version of fn_adfbuilder image from  efedorenko repository and run it granting with 1GB of memory and passing arguments to stdin (the default mode). Furthermore, since the building is a time/resource consuming job, we're going to invoke the function in async mode with an hour timeout.  Having the route created we are able to invoke the function with Fn Cli:

echo -n "/opt/MySampleApp/pom.xml" | fn call adfbuilderapp /build

or over http:

curl -d "/opt/MySampleApp/pom.xml" http://localhost:8080/r/adfbuilderapp/build

In both cases the platform will put the call in a queue (since it is async) and return the call id:

{"call_id":"01C5EJSJC847WK400000000000"}


The function is working now and we can check how it is going in a number of different ways. Since function invocation is just creating and running a Docker container, we can see it by getting a list of all running containers:


docker ps 

CONTAINER ID        IMAGE                               CREATED             STATUS                NAMES

6e69a067b714        efedorenko/fn_adfbuilder:latest     3 seconds ago       Up 2 seconds          01C5EJSJC847WK400000000000
e957cc54b638        fnproject/ui                        21 hours ago        Up 21 hours           clever_turing
68940f3f0136        fnproject/fnserver                  27 hours ago        Up 27 hours           fnserver


Fn has created a new container and used function call id as its name. We can attach our stdin/stdout to the container and see what is happening inside:

docker attach 01C5EJSJC847WK400000000000

Once the function has executed we can use Fn Rest API (or Fn Cli) to request information about the call:

http://localhost:8080/v1/apps/adfbuilderapp/calls/01C5EJSJC847WK400000000000

{"message":"Successfully loaded call","call":{"id":"01C5EJSJC847WK400000000000","status":"success","app_name":"adfbuilderapp","path":"/build","completed_at":"2018-02-03T19:52:33.204Z","created_at":"2018-02-03T19:46:56.071Z","started_at":"2018-02-03T19:46:57.050Z","stats":[{"timestamp":"2018-02-03T19:46:58.189Z","metrics":
....


http://localhost:8080/v1/apps/adfbuilderapp/calls/01C5EJSJC847WK400000000000/log


{"message":"Successfully loaded log","log":{"call_id":"01C5EKA5Y747WK600000000000","log":"[INFO] Scanning for projects...\n[INFO] ------------------------------------------------------------------------\n[INFO] Reactor Build Order:\n[INFO] \n[INFO] Model\n[INFO] ViewController\n[INFO]
....


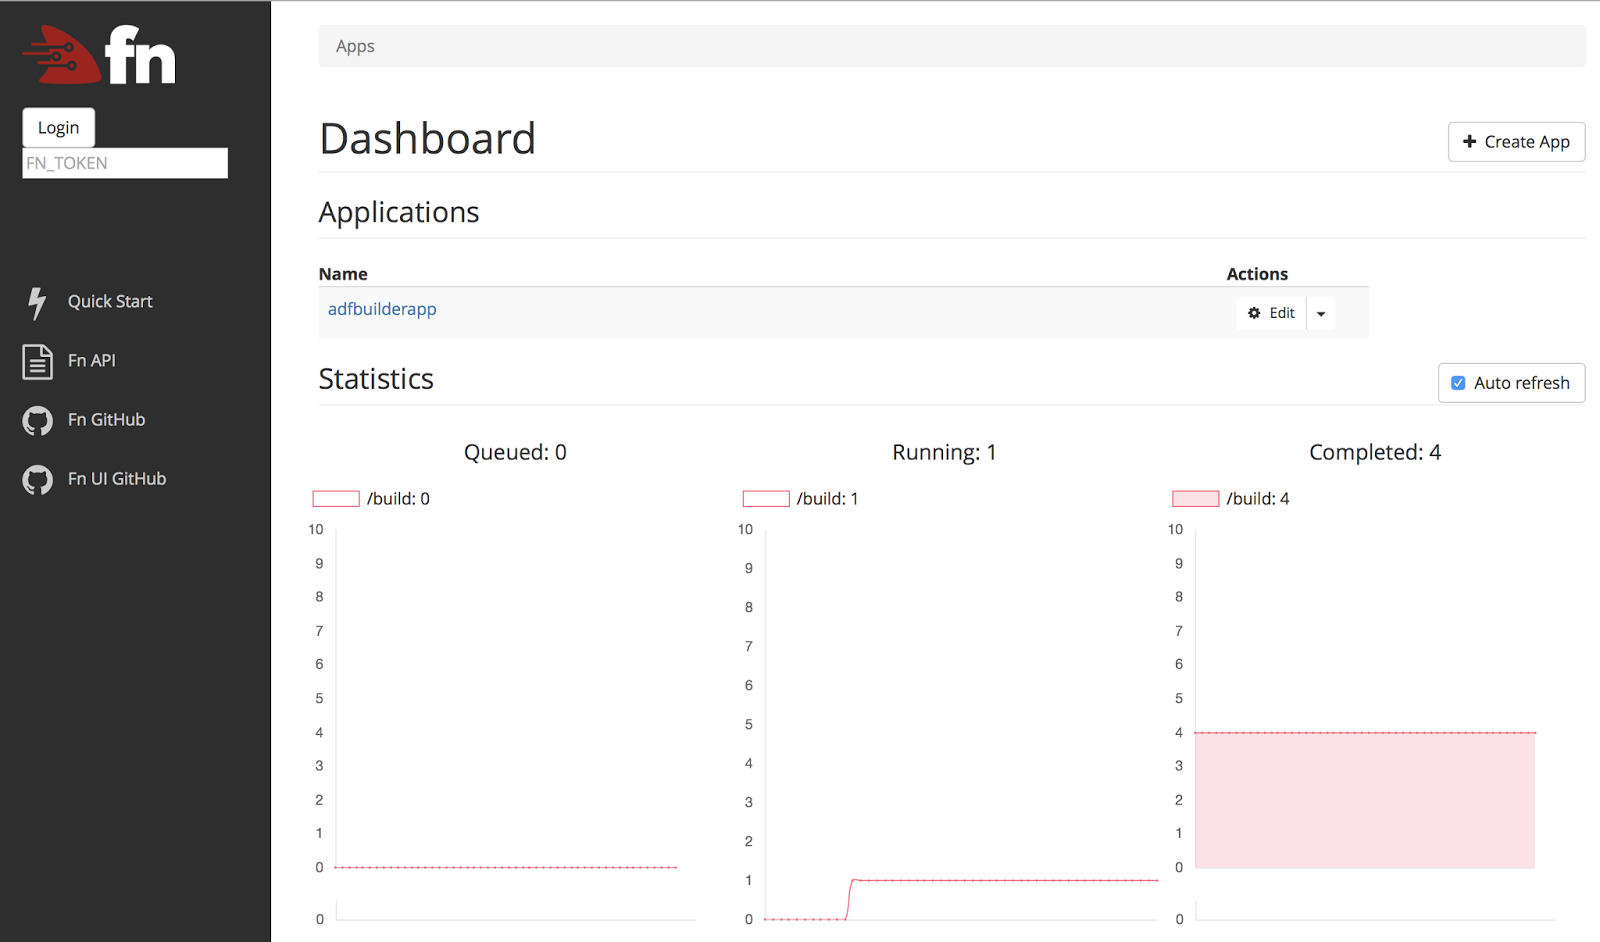
We can also monitor function calls in a fancy way by using Fn UI dashboard:


The result of our work is a function that builds ADF applications. The beauty of it is that the consumer of the function, the caller, just uses Rest API over http to get the application built and the caller does not care how and where this job will be done. But the caller knows for sure that computing resources will be utilized no longer than it is needed to get the job done.

Next time we'll try to orchestrate the function in Fn Flow.

That's it!


27 Jan 2018

Running ADF Essentials on Tomcat in a Docker container

I develop sample applications pretty often. I try out some ideas, play with some techniques and share the result of my investigations with my colleagues and blog readers by the means of sample applications. When someone wants to see how the technique was implemented they just look into the source code and that's enough to get the idea. But if they want to see how it actually works and play with it, they need to find the right version of JDeveloper, start it, run the sample application and, probably, dance a little with a tambourine to get it working. Too complicated and not fun. What would be fun is to have a lightweight Docker container with deployed sample application which everyone can easily run on their Docker environment. In this post I am going to show what I did to create a preconfigured docker-image-template which I will use to create images with deployed sample applications.

Since the key is to have a lightweight container and since my sample ADF applications rarely go beyond essentials functionality I decided to create a Docker container running Tomcat with ADF Essentials on top of that.

So, let's start:

1. Pull and run Tomcat image from Docker hub:

docker run -it -p 8888:8080 --name adftomcat tomcat:8.0 

Having done that, you would be able to observe the running Tomcat here http://localhost:8888.

2. Install the latest Java in the container:

In a separate terminal window dive into the container:
docker exec -it adftomcat bash


And install Java:
apt-get update
apt-get install software-properties-common 
add-apt-repository "deb http://ppa.launchpad.net/webupd8team/java/ubuntu xenial main"
apt-get update 
apt-get install oracle-java8-installer  

3. Download ADF Essentials (including client) from Oracle Website

This will give you to archives: adf-essentials.zip and adf-essentials-client-ear.zip. Copy them in the container:

docker cp ~/Downloads/adf-essentials.zip adftomcat:/usr/local/tomcat/lib
docker cp ~/Downloads/adf-essentials-client-ear.zip adftomcat:/usr/local/tomcat/lib

Go to the container (docker exec -it adftomcat bash) and unzip them with -j option:

unzip -j  /usr/local/tomcat/lib/adf-essentials.zip
unzip -j  /usr/local/tomcat/lib/adf-essentials-client-ear.zip

4. Download javax.mail-api-1.4.6.jar from here and copy it into the container:

docker cp ~/Downloads/javax.mail-api-1.4.6.jar adftomcat:/usr/local/tomcat/lib

5. Install nano text editor in the container:

apt-get install nano


6. In the container create setenv.sh file in /usr/local/tomcat/bin folder:

nano /usr/local/tomcat/bin/setenv.sh


With the following content:


JAVA_HOME=/usr/lib/jvm/java-8-oracle
CATALINA_OPTS='-Doracle.mds.cache=simple -Dorg.apache.el.parser.SKIP_IDENTIFIER_CHECK=true'


7. In the container update  /usr/local/tomcat/conf/context.xml file:


nano /usr/local/tomcat/conf/context.xml

And add the following line in the <Context> section

<JarScanner scanManifest="false"/>

8. Basically, this is enough to deploy an ADF application to the container. I created an image out of this preconfigured container for future uses as a template. 

docker commit adftomcat efedorenko/adftomcat

9. Develop a "Tomcat-compatable" sample ADF application (check Chandresh's blog describing how to create an ADF application suitable for Tomcat). Deploy it to a war and copy the war into the container:

docker cp tcatapp.war adftomcat:/usr/local/tomcat/webapps

10. Restart the container

docker stop adftomcat
docker start -I adftomcat

11. Check the application availability here http://localhost:8888/MY_CONTEXT_ROOT/faces/main.jsf


12. Now we can create an image out of this container, run it in a docker cloud or just share it with your colleagues so they can run it wherever they prefer.


That's it!


28 Dec 2017

Building Oracle ADF applications with Docker

Recently a good friend of mine was facing a regular problem with building an ADF application v.12.2.1.2 with the public Oracle Maven Repository. He asked me to check if it worked for me. Well... it didn't. So, there was some problem with the repository. In order to make the experiment clean and to avoid any impact on my working environment I decided to run the test in a docker container. And even though I could not help my friend (it simply didn't work throwing some dependency exception), as the result of this check I got a reusable docker image which serves as a preconfigured building machine for ADF applications (for v. 12.2.1.3 the Oracle Maven Repository worked fine at that moment).

This is what I did:

1. Pull and run an ubuntu Docker image

$: docker run -it --name adfbuilder ubuntu


2. Install Java in the adfbuilder container

apt-get install software-properties-common python-software-properties
add-apt-repository ppa:webupd8team/java
apt-get update
apt-get install oracle-java8-installer

3. Install Maven in the adfbuilder container

Just download maven binaries and unzip them in some folder and copy into the container:

docker cp ~/Downloads/apache-maven-3.5.2 adfbuilder:/opt/apache-maven-3.5.2

Update PATH environment variable in the container

export PATH=$PATH:/opt/apache-maven-3.5.2/bin

Having done that, the mvn should be available. Run it in the container and it will create a hidden .m2 folder in the user's home.

4. Configure Maven in the adfbuilder container to work with Oracle Maven Repository

Just put in the hidden .m2 folder 

 docker cp settings.xml adfbuilder:/root/.m2/settings.xml

settings.xml file with the following content:
<settings xmlns="http://maven.apache.org/SETTINGS/1.0.0" xmlns:xsi="http://www.w3.org/2001/XMLSchema-instance"
          xsi:schemaLocation="http://maven.apache.org/SETTINGS/1.0.0                       https://maven.apache.org/xsd/settings-1.0.0.xsd">
  <servers>
    <server>
      <id>maven.oracle.com</id>
      <username>eugene.fedorenko@flexagon.com</username>
      <password><MY_PASSWORD></password>
      <configuration>
        <basicAuthScope>
          <host>ANY</host>
          <port>ANY</port>
          <realm>OAM 11g</realm>
        </basicAuthScope>
        <httpConfiguration>
          <all>
            <params>
              <property>
                <name>http.protocol.allow-circular-redirects</name>
                <value>%b,true</value>
              </property>
            </params>
          </all>
        </httpConfiguration>
      </configuration>
    </server>
  </servers>
  <profiles>
    <profile>
      <id>main</id>
      <activation>
        <activeByDefault>true</activeByDefault>
      </activation>
      <repositories>
        <repository>
          <id>maven.oracle.com</id>
          <releases>
            <enabled>true</enabled>
          </releases>
          <snapshots>
            <enabled>false</enabled>
          </snapshots>
          <url>https://maven.oracle.com</url>
          <layout>default</layout>
        </repository>
      </repositories>
      <pluginRepositories>
        <pluginRepository>
          <id>maven.oracle.com</id>
          <url>https://maven.oracle.com</url>
        </pluginRepository>
      </pluginRepositories>
    </profile>
  </profiles>
</settings>
Basically, this is enough to compile a Maven-configured ADF application in the container. We need to make sure that there is an access to the source code of our application from the container. This can be done either by mapping a source folder to be visible from the container or just by coping it into the container.

docker cp /mywork/MySampleApp adfbuilder:/opt/MySampleApp

Having done that, we can run the following command to get the application compiled:

docker exec adfbuilder mvn -f /opt/MySampleApp/pom.xml compile

5. Copy JDeveloper  binaries into the container
As we want to go beyond this point and be able not only to compile, but to produce deployable artifacts (ears, jars, etc.), we will need to put JDeveloper  binaries into the container (basically, maven will need ojdeploy).  I have just copied  Oracle_Home folder from my Mac to the container:

docker cp /My_Oracle_Home adfbuilder:/opt/Oracle_Home

So, now I am able to build a ear for my application in the container:

docker exec adfbuilder mvn  -f /opt/MySampleApp/pom.xml package -DoracleHome=/opt/Oracle_Home

For the first run it may ask you to provide you the path to your JDK

[INFO] Type the full pathname of a JDK installation (or Ctrl-C to quit), the path will be stored in /root/.jdeveloper/12.2.1.3.0/product.conf
/usr/lib/jvm/java-8-oracle

6. Commit changes to the container
The final thing we need to do is to commit changes to the container:

docker commit adfbuilder efedorenko/adfbuilder

This will create a new ubuntu image containing all changes that we applied. We can easily run that image wherever we want across our infrastructure and use it as a building machine for ADF applications. The beauty of it is that we can run it in a cloud like Docker Cloud (backed by AWS, Microsoft Azure, Digital Ocean, etc.) or Oracle Container Cloud Services or whatever you prefer. With this approach servers in the cloud build your application for you which in general is a quite resource-consuming job.

Thant's it!