30 Nov 2015

Master-Detail data with ADF List View

Lately the ADF Faces table component has not been considered cool anymore from UI perspective. List View is supposed to be cool today for displaying data collections. It doesn't mean that we shouldn't use af:table at all. In some cases (pretty often :)) a table is far more suitable than a list view. However, the list view component looks really nice, it fits well with the modern UI tendency and it definitely deserves to be used widely in ADF applications.

One of the most common use-cases related to data collections is displaying master-detail data. In this post I am going to show what we can do about that with List View.

The List View component provides out-of-the-box functionality to display hierarchical data by the use of groupHeaderStamp facet.
Let's say there is Departments-Employees hierarchy defined in the application:


If we drag the detail collection Employees onto a page and choose ADF List View as a desired component, the wizard will allow us to include a group header containing attributes from the parent collection:


As a result the list view on the page will contain groupHeaderStamp facet with Department attributes:

<af:listView value="#{bindings.Departments.treeModel}" var="item" ...
             fetchSize="#{bindings.Departments.rangeSize}" id="lv1">
  <af:listItem id="li1">
    <af:panelGridLayout id="pgl2">
      <af:gridRow marginTop="5px" height="auto" marginBottom="5px" id="gr1">
        <af:gridCell marginStart="5px" width="34%" id="gc1">
          <af:outputFormatted value="#{item.bindings.EmployeeId.inputValue}"
          id="of1"/>
        </af:gridCell>
        ...
    </af:panelGridLayout>
  </af:listItem>
  <f:facet name="groupHeaderStamp">
    <af:listItem id="li2">
      <af:outputFormatted value="#{item.bindings.DepartmentName.inputValue}"
          id="of6"/>
    </af:listItem>
  </f:facet>
</af:listView>


And it looks like this:


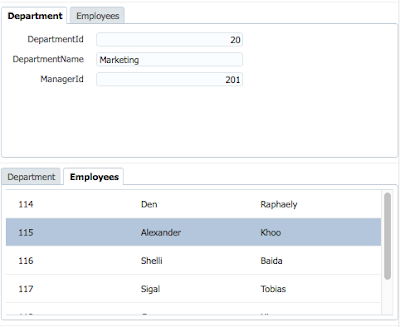
It looks nice, but it is not actually what I need!  My requirement is to implement something like this:


So that each department is represented with a panel containing two tabs: general department info and list of employees. This use-case can be easily implemented using Accessors from the tree model node definition. The tree model for our list view in the page def file looks like this:

<tree IterBinding="DepartmentsIterator" id="Departments">
  <nodeDefinition DefName="DepartmentsDeafultVO" Name="Departments0">
    <AttrNames>
      <Item Value="DepartmentId"/>
      <Item Value="DepartmentName"/>
    </AttrNames>
    <Accessors>
      <Item Value="Employees"/>
    </Accessors>
  </nodeDefinition>
  <nodeDefinition DefName="EmployeesDeafultVO" Name="Departments1">
    <AttrNames>
      <Item Value="EmployeeId"/>
      <Item Value="FirstName"/>
      <Item Value="LastName"/>
      <Item Value="Email"/>
    </AttrNames>
  </nodeDefinition>
</tree>

There is Employees accessor defined in the Departments0 node definition. It uses Employees view link accessor to retrieve detail records for each department row. The structure of detail records is described in the Departments1 node definition.
We are going to make use of this hierarchical tree model like this:

<af:listView value="#{bindings.Departments.treeModel}" var="item" ...>            
  <af:listItem id="li1">
   <af:panelTabbed position="above" id="pt1" childCreation="lazyUncached">
    <af:showDetailItem id="tab1" text="Department">
      <af:panelFormLayout id="pfl1" inlineStyle="height:150px;">
      <af:panelLabelAndMessage label="#{item.bindings.DepartmentId.hints.label}"
                               id="plam1">
        <af:inputText value="#{item.bindings.DepartmentId.inputValue}"id="ot1"/>
      </af:panelLabelAndMessage>
        ...

      </af:panelFormLayout>
    </af:showDetailItem>
    <af:showDetailItem id="sdi1" text="Employees">
     <af:listView value="#{item.Employees}" var="empItem" ...>
      <af:listItem id="li2">
        <af:panelGridLayout id="pgl2">
          <af:gridRow  id="gr1">
            <af:gridCell id="gc1">
       <af:outputFormatted value="#{empItem.bindings.EmployeeId.inputValue}"
                           id="of1"/>
            </af:gridCell>
            ...
        </af:panelGridLayout>
      </af:listItem>
     </af:listView>
    </af:showDetailItem>
    </af:panelTabbed>
  </af:listItem>
</af:listView>

So each list item contains a panel tabbed inside and the Employees tab contains a nested list view (actually it could be whatever, for example a table) referring to the Employees accessor.

The sample application for this post is available here. It requires JDeveloper 12.1.3.

That's it!


22 Nov 2015

Dynamic View Criteria UI Hints

In this post I am going to show how we can manipulate view criteria UI hints (such as Show in List, Search Region Mode, Show Operators,  etc.) dynamically on-the-fly. Let's consider a use case when we need to show or hide a view criteria in the drop down list of af:query component depending on user permissions.

Actually, it's very easy. We have to override ViewObjectImpl method getViewCriteria(String name) like this:

@Override
public ViewCriteria getViewCriteria(String name)
{
  ViewCriteria vc = super.getViewCriteria(name);
  if (isCriteriaPermitted(name))
  {
    vc.setProperty(ViewCriteriaHints.CRITERIA_SHOW_IN_LIST,
                   ViewCriteriaHints.CRITERIA_HINT_TRUE);     
  }
  else
  {
    vc.setProperty(ViewCriteriaHints.CRITERIA_SHOW_IN_LIST,
                   ViewCriteriaHints.CRITERIA_HINT_FALSE);
  }
  return vc;
}

isCriteriaPermitted in this code snippet is a custom method returning whether the view criteria is available for the user on af:query component. The getViewCriteria method can be overridden in your base ViewObjectImpl class in order to provide a generic solution for this use case across the application.

That's it! 


21 Oct 2015

Passivation of Entity Transient Attributes

Everyone knows about VO transient attributes. In order to make them passivation/activation safe (capable of surviving AM passivation/activation cycle) we have to either select Passivate checkbox for each such transient attribute or select Passivate State and Including All Transient Values checkboxes for the entire view object. In that case the framework will save values of those transient attributes to the passivation storage during the passivation and read these values back during the activation. It's clear. But how about entity transient attributes? Very often this question gets ADF developers confused. There are not any "passivation" checkboxes available for the entity definition or entity attributes. Does it mean that entity transient attributes are not passivation/activation safe and their values are going to be lost during AM recycling?

Everything is going to be all right! The passivation of entities is switched on by design. The framework saves values of all dirty entity attributes to the passivation storage. This is true for transient attributes as well.
Let's assume there is DepartmentsEO entity with a transient attribute SomeTransAttribute. If value of this attribute is modified then the framework writes to the passivation storage the following structure:

      <EO Name="com.adfpractice.entitytransattrpassiv.model.entities.DepartmentsEO">
         <![CDATA[00010000000AACED000577040000000A]]>
         <DepartmentsEORow PS="2" Hdl="1">
            <SomeTransAttribute>
               <DATA>56</DATA>
               <ORIG_DATA null="true"/>
            </SomeTransAttribute>
         </DepartmentsEORow>
      </EO>
  
Actually, this is passivation data for the dirty entity instance and it contains value (56) of the modified transient attribute SomeTransAttribute.

That's it!

15 Oct 2015

Automated Software Testing of Fusion Middleware applications with FlexDeploy

Automated software testing is one of the mandatory activities that any software organization should perform in order to be able to guarantee quality of their products. However, very often this process turns to be a pretty complicated thing, especially when it comes to automated testing of modern complex systems consisting of a number of different parts. All those parts are based on different technologies and, apparently, different technologies should be used to test them. In reality QA engineers operate with various testing tools in order to perform testing of each part of the system, to test the whole system, to perform different test types such as functional, performance, integration, etc. Each testing tool produces its own test results and QAs should gather all that data from different sources and analyze them in order to be able to make any decisions about quality of the system. It would be nice to put all that stuff to one place and to completely automate this complicated process. That would increase quality of the test automation itself and allow to make automated testing as a step of the Continuous Delivery process.

I have posted already about a new DevOps and CD tool for Fusion Middleware applications FlexDeploy. I was pleased with the opportunity to have a look at the beta version of the system (3.0) and was able to kick the tires. Among many other cool features the new version delivers Test Automation functionality. FlexDeploy 3.0 becomes a powerful instrument that puts Test Automation process under the control and makes it much easier by implementing the following concepts:
  • Central management panel to perform, control and monitor all automated testing activities in the organization 
  • Hub for gathering test results from the all used testing tools
  • Central tool for building QA dashboard reports across the organization for making "Go-Live/Not-Go-Live" decisions
  • Support Automated Testing as a mandatory step of the CD process
In this post I am going to highlight the key FlexDeploy features related to Test Automation which may help to understand how the concepts above are implemented and how it actually works.

Integration with 3rd party testing tools
Actually FlexDeploy doesn't perform any automated tests itself. This job is to be done by a great number of various testing tools. FlexDeploy just controls the process and, obviously, it is able to interact with the testing tools. This interaction ends up with the following tasks:
  • Execute tests
  • Import test results
The integration with 3rd party testing tools is implemented by the use of plugins. At this point FlexDeploy 3.0 provides plugins for JUnit and TestNG tools only. However, the range of plugins is going to get much wider in the upcoming versions. As far as I know the tools like Oracle Application Testing Suite (OATS), Selenium, Test Complete, etc. are on the roadmap. Actually, if FlexDeploy doesn't provide a plugin for some testing tool out-of-the-box we can always use Shell plugin which allows to execute batch scripts in order to interact with the testing tool.

Basically, the plugins act as adaptors for various testing tools. They command testing tools to run tests and they import test results into unified test result storage. This allows to analyze test results and build dashboard reports abstracting away from the exact testing tool. 

Test Definition
FlexDeploy introduces a notion of Test Definition. This abstraction represents one or a bunch of test cases related to some business use case.  For example, for a banking system we can define test definitions such as "Loan arrangement", "Loan repayment", "Loan overdue", etc.


Basically, when FlexDeploy is running automated tests it is, actually, running test definitions one-by-one. And each test definition, in its turn, is running the actual test cases with a corresponding testing tool. It knows what testing tool is going to be used, how to interact with it, what bunch of test cases (defined at the testing tool) should be used, how to import test results and how to qualify them. In order to interact with a testing tool a test definition uses a workflow. Workflows is a powerful mechanism which is commonly used in FlexDeploy to perform build and deploy activities. Now it is used for automated testing as well.  


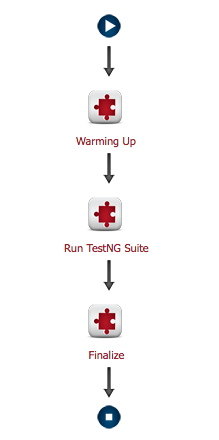
Actually a test workflow invokes a plugin to interact with a testing tool. Besides just running test cases and importing test results, a test workflow can also perform any other activities as well. For example some preparation work before running tests (like warming up phase) or some finalization activities after running tests. 

Test Qualifiers
A test definition is able to analyze test results and come up with the conclusion whether the test run succeeded or failed. This feature is based on test qualifiers. A test definition can contain a number of test qualifiers such as "Number of Test Cases PASSED greater than X", "Percentage of Test Cases FAILED less than Y", etc.
If all test qualifiers, defined at the test definition, return true, then the test run is considered successful. FlexDeploy provides a set of some predefined test qualifiers, but they plan to allow users to define their own custom qualifiers basing on Groovy expressions.


Test Set
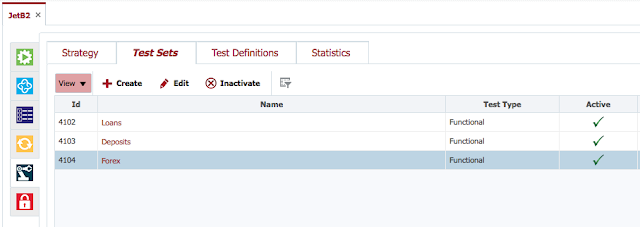
A test set is just a group of test definitions. For example for a banking system we could define test sets such as "Loans", "Deposits", "Forex", etc. A test set can contain its own qualifiers in order to check whether the entire set of test definitions passed or failed.


Test Execution
At this point automated tests can be executed either manually:


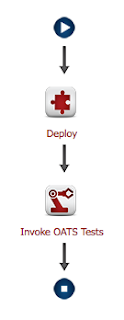
or automatically as a step of a deployment process:


I guess the upcoming versions of FlexDeploy will allow to automatically execute tests on a schedule basis independently from the deployment process.

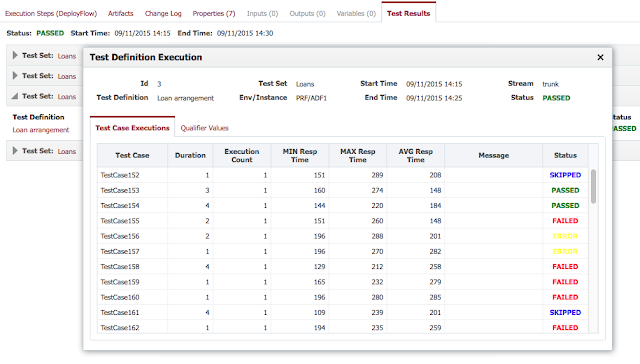
Each test execution (either manual or within deployment) comes up with corresponding test results:


Dashboard
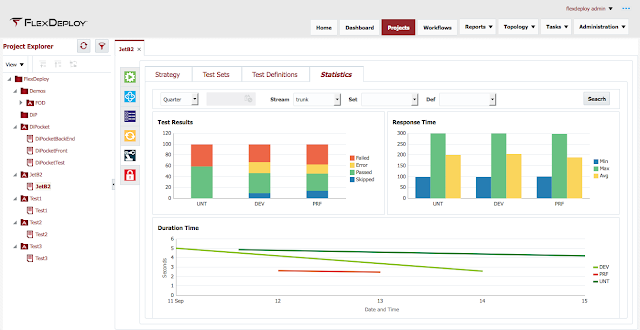
FlexDeploy 3.0 provides a new dashboard tab "Test Automation". It represents the passed/failed ratio of test executions across environments, the duration time of test runs and response times:


This information is also available on "Test Automation" section of the project definition. In this case all the charts are based on test results related to this project:


By implementing test automation functionality FlexDeploy 3.0 has made a giant step along the path of getting continuous delivery process fully automated. Of course, there are still lots of things to be done, but they have built a good basis which is going to be just enriched with new test automation features in upcoming FlexDeploy versions.

That's it!


30 Sept 2015

Calculating VO Transient Attributes

In this post I am going to consider a use-case when we need to calculate value of a VO transient attribute according to some complicated and resource-consuming business logic.

Let's say there is a method in a ViewRowIml class:
public String getValueForSomeTransAttr()
{   
  return getBusinessLogicFactory().
           getSuperComplexBusinessLogic.evaluateForKeyValue(getPrimaryKey());
}

We could use this method either in attribute's getter method:
  public String getSomeTransAttr()
  {   
    return getValueForSomeTransAttr();
  }

or we could use it in Groovy expression for the attribute:

Both options are bad, because the method is going to be invoked every time whenever the attribute value is accessed, and that could happen a number of times within the request. Of course we'd like to avoid extra executions of our super complicated business logic. Basically, the value of the transient attribute depends on primary key only, which means that we want to calculate it only once for each row (assuming that primary key value never changes). In order to meet this requirement we have to set "false" in Refresh Expression Value:


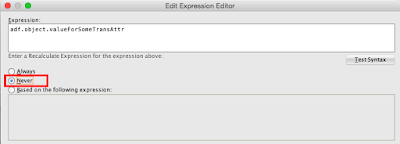
The same thing can be done using Edit Expression Editor:


Having done that, the method will be invoked only when a VO row is created from VO result set and when a new row is created by a user in UI.

That's it!


28 Sept 2015

Show an Image in a Popup Window

There is a very common use-case when we have a link with an image on a page and we need to show a full-size version of the image in a popup window by clicking on the link. In this post I am going to show a few implementations of this use-case in ADF application.

Inline Popup
The first and the most obvious solution is to use af:popup and af:showPopupBehavior tags. Something like this:

<af:link text="Inline Popup" id="l1" icon="/images/turtle.jpg"
         iconPosition="top" styleClass="ImageLink">
  <af:showPopupBehavior popupId="p1"/>
</af:link>

<af:popup animate="false" contentDelivery="lazyUncached"
          childCreation="deferred" id="p1">
  <af:panelWindow resize="on" stretchChildren="first" id="pw1" title="Turtle">
    <af:image id="dc_i1" source="/images/turtle.jpg"/>
  </af:panelWindow>
</af:popup>

In this case an inline popup is going to be shown whenever the link is clicked:


So, it is pretty easy to implement and it works quite fast and nice.
What if we don't want to use an inline popup and we prefer to show the image in a separate browser window?

Separate browser tab
Let's assume the requirement is to show the image in a separate browser tab.
Actually, it is very easy to implement. We're going to use destination and targetFrame attributes of af:link component:

<af:link text="Destination" id="l2" icon="/images/turtle.jpg"
         iconPosition="top" styleClass="ImageLink"
         destination="/images/turtle.jpg" targetFrame="_blank"/>

So, whenever the link is clicked a new tab should be opened with a full-size image inside it. Actually, the "_blank" targetFrame forces the browser to open a new tab.


Separate browser window
If we want to force a browser to show the image inside a new window, we're going to use either of the following techniques:

ADF dialog: action
This is a pure ADF technique and it is based on ability to show a page in a new browser window while navigating to it. There are two pages in our page flow:

The ImageView contains an image:
  <af:form id="f1">
    <af:image source="/images/turtle.jpg" id="i1"/>
  </af:form>

And the MainView contains a link:
<af:link text="Dialog action" id="l3" icon="/images/turtle.jpg"
         iconPosition="top"
         action="dialog:showImage"
         useWindow="true" windowHeight="400" windowWidth="400"/>

Pay attention to the useWindow attribute and to the action name which starts with "dialog:" prefix. These two things force the browser to show ImageView page in a new window. The size of this new window is defined with windowHeight and windowWidth attributes.
This approach works fine, but I wouldn't say that this solution is the best one in terms of performance. Whenever the framework is processing such "dialog:" navigation it seams that a spaceship is starting  on Cape Canaveral. It may take a second or two to open this new tab.

Java Script Approach
This lightweight solution uses a java script to open a new browser window:

function showImage(event)
{
  var link = event.getSource();
  popupWindow = window.open(link.getProperty("imageSrc"),
                            'Turtle', 'height=400,width=400');
}

There is a corresponding clientListener defined for the link:
<af:link text="Java Script" id="l4" icon="/images/turtle.jpg"
         iconPosition="top" styleClass="ImageLink">
  <af:clientListener method="showImage" type="action"/>
  <af:clientAttribute value="#{ImageBean.endpointURL}/images/turtle.jpg"
                      name="imageSrc"/>
</af:link>

In order to pass correct image URI to the Java Script function we are using a managed bean method getEndpointURL:

public String getEndpointURL()
{
  FacesContext facesContext = FacesContext.getCurrentInstance();
  HttpServletRequest request =
    (HttpServletRequest) facesContext.getExternalContext().getRequest();
  String url = request.getRequestURL().toString();
  StringBuffer newUrlBuffer = new StringBuffer();
  newUrlBuffer.append(url.substring(0, url.lastIndexOf("faces/")));
  return newUrlBuffer.toString();
}

Basically this method returns URL to the application endpoint.

The sample application for this post can be downloaded here. It requires JDeveloper 12.1.3.

That's it!


31 Aug 2015

Separator facet in PanelGroupLayout

The beauty of ADF is that there is always something to learn. There are plenty of tiny little things in the framework that are worth to know as they could make your life easier. This very short post is for those folks who have overlooked this small but useful feature. I mean the separator facet of the PanelGroupLayout component.

Pretty often ADF developers use PanelGroupLayout while working on the layout of their pages and in order to separate components inside the panel from each other they put some kind of a separator (like spacer) between the components. Something like this:

<af:panelGroupLayout id="pgl1" layout="vertical">
  <af:inputText label="Label 1" id="it1"/>
  <af:spacer width="10" height="10" id="s1"/>
  <af:inputText label="Label 2" id="it2"/>
  <af:spacer width="10" height="10" id="s2"/>
  <af:inputText label="Label 3" id="it3"/>
  <af:spacer width="10" height="10" id="s3"/>
  <af:button text="button 1" id="b1"/>
</af:panelGroupLayout>


There is more elegant way to separate the components by using the separator facet:

<af:panelGroupLayout id="pgl1" layout="vertical">
  <af:inputText label="Label 1" id="it1"/>
  <af:inputText label="Label 2" id="it2"/>
  <af:inputText label="Label 3" id="it3"/>
  <af:button text="button 1" id="b1"/>
  <f:facet name="separator">
    <af:spacer width="10" height="10" id="s1"/>
  </f:facet>
</af:panelGroupLayout>

That's it!

29 Aug 2015

Continuous Delivery of Fusion Middleware applications with FlexDeploy (Part 2)

In one of my previous posts I described a new DevOps and CD tool FlexDeploy. I mentioned that it was a pretty promising and rapidly developing system. Those guys proved my words and released a new version in June 2015. FlexDeploy 2.1 delivers a number of great new features and in this post I am going to focus on some of them.

The first thing you're going to notice is new look and feel. FlexDeploy is an ADF application and in the new version it utilizes the charm and simplicity of Alta UI skin.  But it seems to be not only about a skin, they started to incorporate in the application the Alta UI and the Simplified UI design principles. The "Glance, Scan, Commit" philosophy is recognizable in the new FlexDeploy screens.

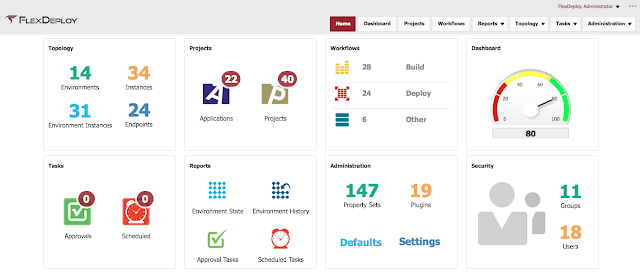
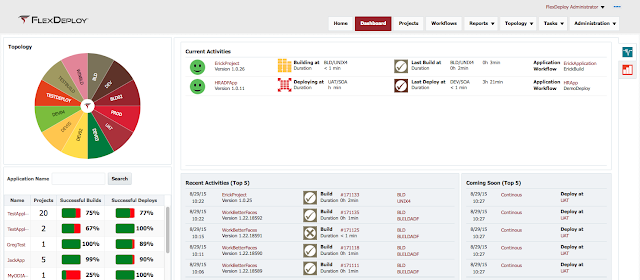
The first screen the users see in the system is Home page:


Basically, this is a navigation approach providing access to all parts of the system and containing some general overview information. In other words this is a "Glance" view.

There is a link on this Home page which gets users to the Dashboard screen. This is a brand new functionality in FlexDeploy. The general concept of the Dashboard screen is an on-line dynamic, interactive report representing the most valuable information in real-time.


There are two tabs on the dashboard screen. The first one is like a flight board in the airport. It represents the current state of things, in other words it shows what is going on right now. Users can monitor what builds and deploys are being performed right now, what happened recently and what is going to be built or deployed in the nearest future. The screen is "on-line" so that it is being refreshed automatically.
It can be bookmarked, put on a separate screen, for example on a TV-panel in a developers room.


The second tab of the dashboard screen represents statistical information such as success ratio and duration time of build and deploy tasks. There are also lists with "Top-5" unsuccessful  and slowest projects in terms of build/deploy processes.
In terms of UX design philosophy the dashboard screen is an example of the "Scan" view. As I already mentioned the dashboard is fully interactive. You can filter the data on the screen and make it related to a particular environment (UAT, QA, DEV), to a specific application, to a selected period of time. Furthermore, you are able to drill down to a specific application, project and even to a build or deploy activity, in other words you are diving to the "Commit" view.

One of the most powerful features that FlexDeploy delivered in the new version is an ability to build a complete continuous delivery process, so that builds and deploys are performed automatically on scheduled basis. You don't have to use any external CD/CI servers for that (like Jenkins or Hudson or something else). Everything is implemented inside FlexDeploy already and available for users just out-of -the-box.
As far as I know, FlexDeploy team is now working on test automation functionality in order to be able to automatically run tests as a part of CD process. Hopefully this feature along with many other interesting things related to test automation will be available in the next version of the system.

"We are going to the cloud!" - this moto can be heard today on every corner in the modern IT world. FlexDeploy is not an exception and in 2.1version it has been integrated with Oracle Cloud Services.
So, now you are free to perform build and deploy operations to the Oracle Java and Database Cloud Services. Furthermore, you can run FlexDeploy itself on the Oracle Java Cloud Service. Basically, it is available on the Oracle Cloud Marketplace.


In this post I didn't cover all new features available in FlexDeploy 2.1, I just highlighted some of them. I believe I will keep posting about this tool and I bet I will find many new interesting features to blog about in upcoming versions.

That's it!

24 Jul 2015

Mastering Oracle ADF Bindings: Advanced Techniques

In this post I would like to thank everyone, who managed to attend my session "Mastering Oracle ADF Bindings: Advanced Techniques" at ODTUG Kscope15 conference in Hollywood, Florida. Thank you guys for waking up early morning and coming at 8:30am to listen to me, to learn something new and to support me. 

I promised at the session that the presentation as well as the sample application would be available for download. 
The presentation is available here:
http://www.slideshare.net/euegenefedorenko/mastering-oracle-adf-bindings

The sample application can be downloaded here. It requires some database objects created in your database and necessary SQL script is included in the application. The application is developed using JDeveloper 12.1.3. So, fill free to use and modify the source code and provided techniques to meet your own requirements.

That's it!

31 May 2015

Understanding ADF Bindings in ADF Lifecycle

In this post I am going to focus on ADF Bindings layer and explore how it works when an ADF page with some data is initially requested from a browser.
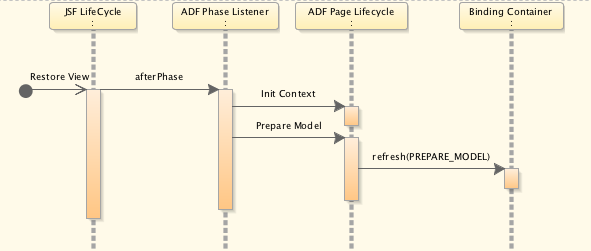
Oracle ADF provides its own extended version of JSF lifecycle. Actually, ADF extends standard JSF lifecycle implementation class and provides ADF phase listener which gets notified with before and after phase events. Here is the list of JSF lifecycle phases extended with corresponding ADF phases:
  • Restore View
    • ADF Init Context
    • ADF Prepare Model
  • Apply Request Values
  • Process Validation
  • Update Model Values
    • ADF Validate Model Updates
  • Invoke Application
    • ADF Metadata Commit
  • Render Response
    • ADF Prepare Render
There are two types of the request: initial request and postback. During the initial request the lifecycle is pretty short. Right after the Restore View phase the lifecycle jumps to the Render Response phase skipping the rest of the phases. 

When a user initially requests an ADF page from a browser the application server performs some preprocessing of the request with a chain of servlet filters. One of them is ADFBindingFilter.  This filter is defined in Web.xml file and it is required to put ADF Bindings into action. So, when this filter handles the request it looks for the Binding Context in the current session and if it is not there a new instance is going to be created. The Binding Context, as a run-time representation of DataBindings.cpx file, contains a mapping between pages and their Page Definition files. It also contains a list of Data Controls that are used in the application. Having all that, the framework investigates what Data Controls and what Binding Containers are going to participate in the request.  ADFBindingFilter finds or creates an instance of each required Data Control and invokes its beginRequest method.


As the Binding Context is initialized the control is returned to the faces servlet which is responsible for processing JSF Lifecycle phases. When JSF Lifecycle is processing the Restore View phase it notifies ADF Phase Listener with the beforePhase event. ADF Phase Listener in its turn dispatches the event to all internal phase listeners such as Update Binding Listener. And this one initializes the required Binding Container by invoking findBindingContainerByPath on the Binding Context.


So, the Binding Context, the Data Control and the Binding Container have been created at the very beginning of the request. The framework uses ADF PageLifeCycle class in order to extend the JSF lifecycle with ADF phases. ADF Phase Listener listens to the afterPhase event of the Restore View phase and invokes appropriate methods on the ADF PageLifeCycle class. In that way the standard JSF restoreView phase has been extended with two ADF phases – InitContext and PrepareModel. During the PrepareModel phase ADF PageLifecycle invokes the refresh method on the Binding Container passing the phase identifier as a parameter.


The Binding Container during the Prepare Model executes any executable entry (iterators, actions, ...) whose refresh property is set to prepareModel. The refresh property is covered in details in this post.

As we are considering an initial request for the page, we're going to skip next lifecycle phases and jump to the render response phase.

ADF Phase Listener listens to the beforePhase event of the Render Response phase and extends it with ADF phase Prepare Render by invoking a corresponding method one ADF PageLifeCycle class. The Prepare Render phase is also called Render Model. During this phase the framework again invokes refresh method on the Binding Container and those iterators whose refresh property is set to renderModel get executed at this moment.
The JSF Lifecycle forwards the control to the page renderer and here while UI components are being rendered they require data from the underlying model. Those iterators whose refresh property is set to deferred (default value) are going to be executed here.
At the very end of the request ADF Binding Filter invokes endRequest method on each Data Control participating in the request. This causes the underlying application modules to be released back to the application module pool.


That's it!

30 Apr 2015

Understanding Iterator Binding Refresh Attribute


In this post I am going to focus on the Refresh attribute of an Iterator Binding that we define in the page definition file.

    <executables>
        <iterator Binds="VEmployees" RangeSize="25"
                  DataControl="EmployeesAMDataControl" id="VEmployeesIterator"
                  Refresh="default"/>
    </executables>


The default value is deferred which means that the iterator is going to be executed on demand at the first access. Basically, this option is good enough for most cases and it is recommended to leave it as is and don’t touch. However, it is interesting, at least to me, what other options mean.

Refresh always means that the iterator is going to be refreshed every time whenever the refresh method is invoked on the BindingContainer. So, the iterator is going to be refreshed a number of times within the request during prepare model, update model and render model phases.

ifNeeded gets the iterator refreshed during prepare model and render model phases but only if it has not been refreshed before. For example we have a mater-detail hierarchy and the details are listed first in the page definition. This will cause  the master to be refreshed twice once for the details and once for its own iterator. IfNeeded option could help here to avoid double refreshes.

The rest of the options are self-explaining.
Never means that the framework will never refresh the iterator, but you can do that manually in your Java code.
PrepareModel forces the iterator to be refreshed each time during the prepare model phase, but PrepareModelIfNeeded does it only if the iterator has not been refreshed to this point. The same is about renderModel and renderModelIfNeeded at the Render Model phase.

So, the refresh attribute determines the lifecycle phases in which to refresh the iterator. Besides that we can provide an optional boolean condition in order to control whether the iterator is really going to be refreshed. We can do that by specifiyng an EL in the RefreshCondition attribute. Whenever the framework is about to refresh the iterator it evaluates that EL expression and if it returns false the iterator is going to be skipped.


That's it!

20 Apr 2015

Altering LOV View Criteria on-the-fly

In this post I am going to show how we can programmatically modify a view criteria which is applied to the view accessor view object at the LOV's popup window.

Let's consider a simple example. There is a page with Employee LOV on it:


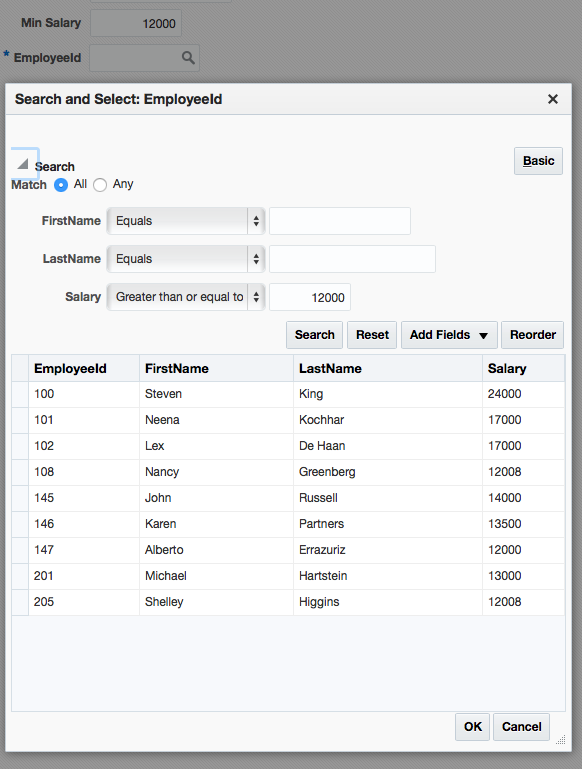
Besides Employee LOV there is Min Salary field on the page. This field stores its value in a managed bean property. Users use this field in order to force the Employee LOV to show only employees whose salary is not less than required. So, basically, if Min Salary is not empty, the LOV dialog should look like this:


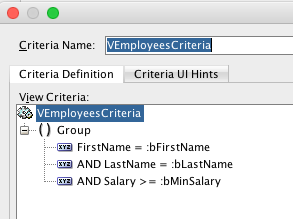
The LOV's view object (VEmployees) has a corresponding view criteria VEmployeesCriteria:


What we're going to do is to set up at run-time the minimum salary value in the LOV's launchPopupListener:

 <af:inputListOfValues id="ilov1"
   launchPopupListener="#{viewScope.TheBean.lovPopupListener}"

And a corresponding managed bean method is going to look like this:

public void lovPopupListener(LaunchPopupEvent launchPopupEvent) {
    UIXInputPopup lovComponent = (UIXInputPopup) launchPopupEvent.getSource();

    //Get LOV's View Criteria
    ListOfValuesModelImpl model = (ListOfValuesModelImpl) lovComponent.getModel();
    ViewCriteria vc = model.getCriteria();

    //Get first View Criteria Row
    ViewCriteriaRow vcr = (ViewCriteriaRow) vc.getRows().get(0);

    //Set up View Criteria Item
    vcr.setAttribute("Salary", getMinSalary())
}

The sample application for this post can be downloaded here. It requires JDeveloper 12.1.3.

That's it!


21 Mar 2015

Continuous Delivery of Fusion Middleware applications with FlexDeploy

Any IT organization sooner or later has to deal with such thing as Continuous Delivery (CD). They realize that there are various environments such as development, QA, support, UAT, production, etc. and there are a number of different systems working in those environments. At some point managing all that stuff manually becomes just impossible and should be automated. There is a plenty of available tools on the market allowing you to automate build and deploy processes. This is a very common case when different tools are used for different applications depending on the underlying technologies of those applications. In time, when the entire infrastructure gets larger, that zoo of different environments, servers, different versions of applications and continuous delivery tools turns to be a nightmare. I know one organization with a pretty large infrastructure where nobody could draw a diagram of their environments. Another guy from the same company told me that it was just impossible to represent it on a peace of paper in two dimensions and it probably would be possible to do that in 3D or better 4D environment :)

So, it would be nice to have a system which allows you to organize and put together all pieces of your  infrastructure, to setup, to control and to monitor them. And such systems exist. In this post I'm going to focus on one of them. This is FlexDeploy. This system is pretty new on the market but I believe that because of its concepts and ideas it has good chances to become popular very soon, especially among organizations working with Oracle Fusion Middleware Products.  FlexDeploy itself is an ADF application and it is mostly focused on continuous delivery and integration of systems which are built using Oracle Fusion Middleware.


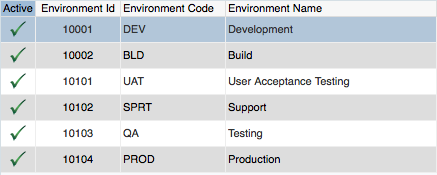
FlexDeploy claims that it doesn't matter how many servers, applications and tools you have. The fundamental theorem of software engineering "We can solve any problem by introducing an extra level of indirection (... except for the problem of too many levels of indirection)" works very well here. There is always some real number of environments in any complicated infrastructure. For example development, build, production, user accepting testing, QA and support. Using this obvious indirection or abstraction any infrastructure can be easily split into these six parts.


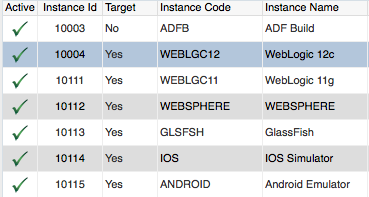
On the other hand, there are instances. For example WebLogic 11g domain, WebLogic 12c domain, WebSphere AS, ESB, ADF building server, Oracle DB, GlassFish AS, ODI, etc. All that is instances. Instances of some systems and tools related to different technologies hosting on different servers across the entire infrastructure. This is the second abstraction.


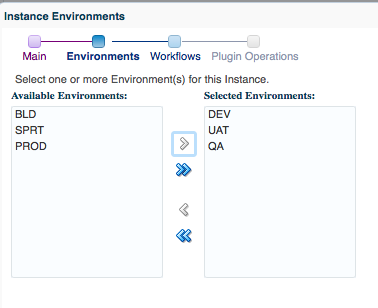
FlexDeploy lets you easily specify for each instance where (in what environment) it works.


Having done that, the topology of your infrastructure can be represented like this:


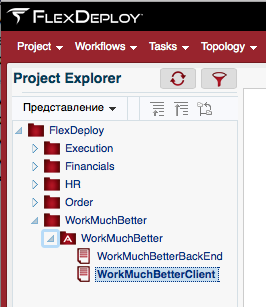
And there are applications consisting of projects. For each of them we can specify where they are going to be built and where they are going to be deployed. So each project is mapped to a build instance and to some deploy instances.  As I mentioned applications consist of projects. For example some Oracle MAF system WorkMuchBetter actually consists of two projects - WorkMuchBetterClient (actually an Oracle MAF mobile application) and WorkMuchBetterBackEnd (a usual ADF application).


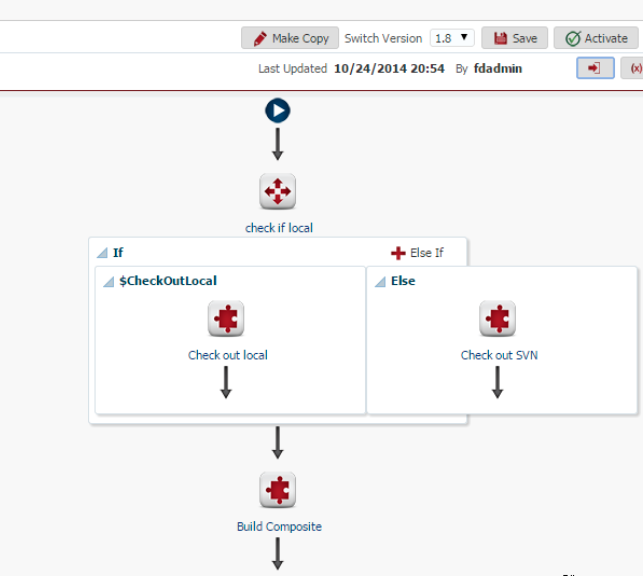
The question is what working horses are actually going to build and deploy projects. There are workflows. FlexDeploy comes up with a very powerful tool for designing build and deploy workflows. A workflow is an orchestration of steps which can be a combination of plugin operations or basic workflow operations such as variable assignment, conditionals, or looping constructs.

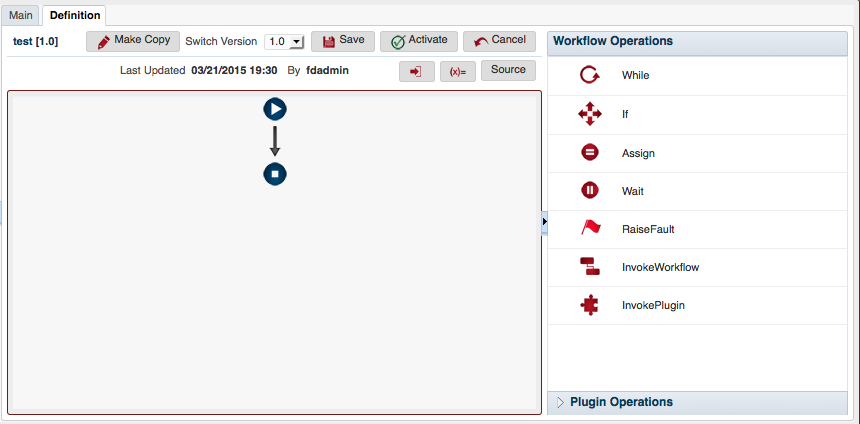
Working with the workflow designer in FlexDeploy is similar to working with the task flow designer in Jdeveloper. There is a sheet with a workflow and there is a palette with workflow operations such as While, If, Assign, Wait etc., and a palette with plugin operations. And you can design a workflow just by dragging activities from the palettes and dropping them onto the sheet.


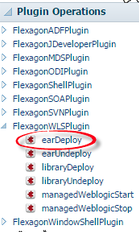
When it comes to plugins, FlexDeploy introduces a wide range of plugins which you can use in your workflows for performing activities related to different technologies. For example fetching source code from SVN or GIT, building an ADF application, deploying application to WebLogic server, running SQL scripts, exporting OSB projects, etc. The full list of supported plugins is available here and a good thing is that this list keeps growing. Basically, if FlexDeploy doesn't have a plugin for a specific task (so far) we can always implement what we need using either Unix Shell plugin or Windows Shell plugin. These plugins let you run any shell script on a corresponding platform.
Prior to FlexDeploy 2.0 you had to install agents on remote servers in order to perform plugin operations on remote servers. An agent is a lightweight Java application responsible for running plugin operations and communicating with the FlexDeploy server. The upcoming FlexDeploy 2.0 uses agentless technology for that just by using ssh connection with a remote server.
So that eliminates managing and monitoring of the agents across your infrastructure making using of FexDeploy much easier.

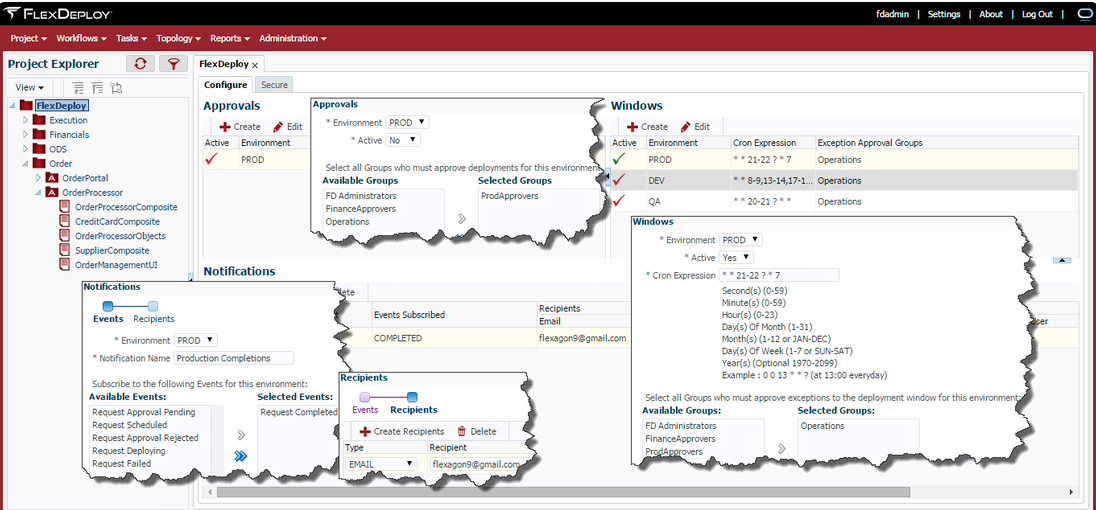
As FlexDeploy is considered to be a fully automated solution it certainly allows you to build and deploy applications on a scheduled basis. When a scheduled task is completed there will be a notification email with the task details. For example when a project is built you receive a letter with SVN changes and links to the artifacts produced by the build workflow. That could be, for example, ear or jar files which can come in handy for software developers. Besides scheduling there is a notion of windows.  A window is a timeframe which can be specified for a certain environment and it means that deployments within this timeframe are allowed by default. But if deployment happens to be outside the window it should be approved as an exception by some authorized person. Otherwise this deployment will be scheduled for the start of the next available window. For example, deployments to the production environment are allowed at night only, but if there is an urgent requirement to deploy during the day, somebody should approve that.


Basically, FlexDeploy is constantly enriching its functionality implementing new plugins and working on visualization features such as dashboards and diagrams. And may be now the application is pretty young but I think it is going to become a matured continuous delivery system very soon.

It is possible to request a demo or trial version on the Flexagon site and to try it out for yourself. FlexDeploy is an ADF application which requires an application server and a database instance. But the cool thing is that the trial version can be installed on your laptop just in one click and it takes a few minutes. It is going to install on your machine Oracle XE instance and GlasFish server. So, if you are not happy with that may be it would be better to use some kind of a virtual machine for such experiments. 

That's it!


28 Feb 2015

LOVs in Oracle MAF

We all love one of the most powerful ADF features lists of values. Using them we can declaratively and easily build pretty complicated functionality in ADF applications. A good thing is that we have a similar approach in Oracle MAF as well. In ADF BC we define LOVs, attribute UI hints, validation  rules, etc. at the Business Service level, basically at the Entity or VO level. In MAF we are able to do the same but at the Data Controls level. This is pretty obvious since who knows what the business service is. It can be whatever in Oracle MAF.
So, in this post I am going to show how we can define and work with LOVs in Oracle MAF.
Let's consider a simple use-case. There is a payment form which looks like this:


An end user selects an account in the drop-down list and the total account balance is going to be used as a default payment amount, however the amount can be changed.
The business model is based on a couple POJO classes:

public class PaymentBO {

    private int accountid;
    private double amount;
    private String note;

and
public class AccountBO {

    private int id;
    private String accountName;
    private double balance;

There is also AccountService class providing a list of available accounts:
public class AccountService {

    private final static AccountService accountService = new AccountService();

    private AccountBO[] accounts = new AccountBO[] {
        new AccountBO(1, "Main Account", 1000.89),
        new AccountBO(2, "Secondary Account", 670.78),
        new AccountBO(3, "Pocket Account", 7876.84),
        new AccountBO(4, "Emergency Account", 7885.80)
    };


    public AccountBO[] getAccounts() {
        return accounts;
    }


    public static synchronized AccountService getInstance() {
        return accountService;
    }

And there is PaymentDC class which is exposed as a data control:
public class PaymentDC {

    private final PaymentBO payment = new PaymentBO();
    private final AccountService accountService = AccountService.getInstance();

    public PaymentBO getPayment() {
        return payment;
    }


    public AccountBO[] getAccounts() {
        return accountService.getAccounts();
    }
}

The DataControl structure looks like this:


In order to be able to define Payment attribute settings such as UI hints, validation rules, LOVs, etc. I am going to click the pencil button and I will have a form which looks pretty similar to what we have in ADF BC:


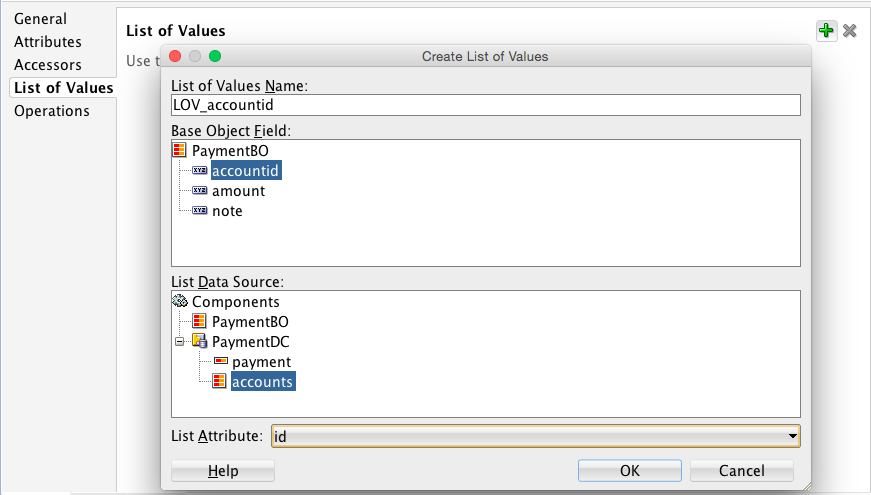
Those who are familiar with ADF BC will hardly get lost here. So, at the List of Values page we can define a LOV for the accountid attribute:


Having done that, we're able to setup LOV's UI hints, etc. Basically that's it. All we need to do is to drop accountid attribute from that DataControl palette onto a page as a selectOneChoice component.


<amx:selectOneChoice value="#{bindings.accountid.inputValue}"
                     label="#{bindings.accountid.label}" id="soc1">
    <amx:selectItems value="#{bindings.accountid.items}" id="si1"/>
</amx:selectOneChoice>


The framework will do the rest defining the list binding definition in the pageDef file:

 <list IterBinding="paymentIterator" StaticList="false"
        Uses="LOV_accountid" id="accountid" DTSupportsMRU="true"
        SelectItemValueMode="ListObject"/>


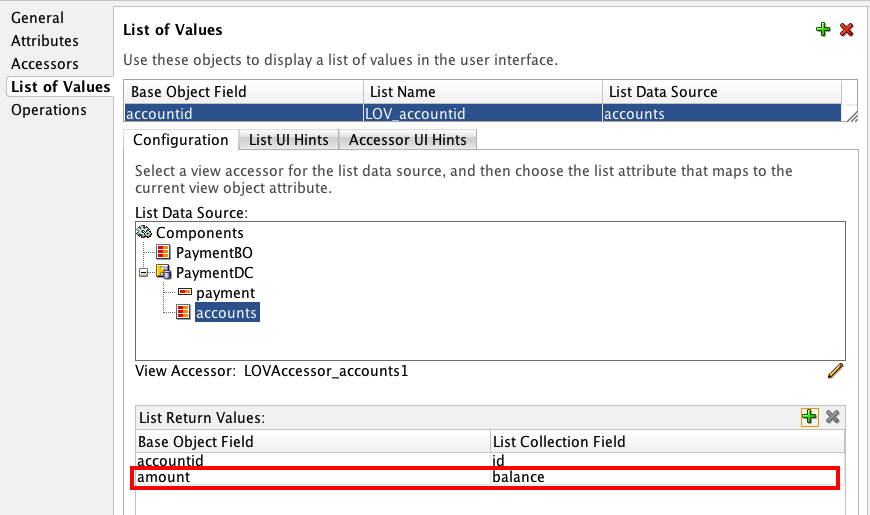
But we have to implement somehow setting of the payment amount with the account balance when the account is selected. In ADF we would be able to define multiple attribute mappings in the LOV's definition and that would be the solution. Like this:


But in MAF it doesn't work. Unfortunately.  Only the primary mapping works. So, we're going to do that manually in the PaymentBO.setAccountid  method:

public void setAccountid(int accountid) {
    this.accountid = accountid;

    AccountBO account = AccountService.getInstance().getAccountById(accountid);
    if (account != null) {
        setAmount(account.getBalance());
    }
}

And in the PaymentBO.setAmount method we have to fire a change event in order to get the amount field refreshed on the page:

public void setAmount(double amount) {
    double oldAmount = this.amount;
    this.amount = amount;
    propertyChangeSupport.firePropertyChange("amount", oldAmount, amount);
}


That's it!
The sample application for this post can be downloaded here. It requires JDeveloper 12.1.3 and MAF 2.1.0.


31 Jan 2015

Declarative SQL Mode Pitfall

As we know a view object definition supports three SQL modes. There are normal, declarative and expert modes. In this post I'm going to focus on the declarative SQL mode. This smart mode allows the framework to automatically build SQL queries at run time according to the attributes asked by the view layer. Furthermore, depending on the attributes being asked, the frameworks builds not only the Select clause but the entire query. So, the From clause contains only entities that are needed to provide asked attributes and as a result of the VO execution only those entities are created and stored in the entity cache. The declarative SQL mode is widely recommended and it became a default mode in JDeveloper 12c. However, we should be careful with this approach since we can run into a small pitfall that I'm going to highlight in this post.
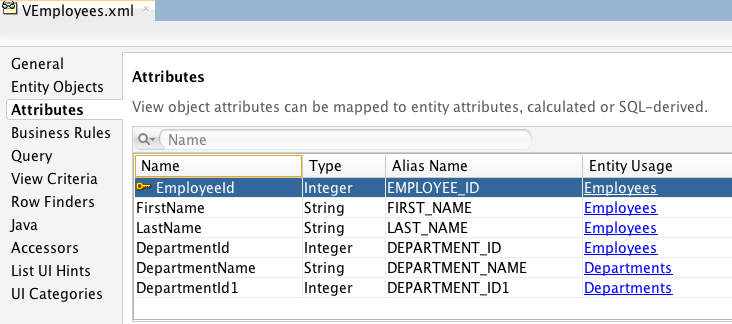
In my example there is a simple VO based on Employees and Departments entities:

The VO is set up to use the declarative SQL mode.
There are a couple of pages in the ViewController project containing a table with employees (Main) and a form with employee's details (Detail):
Both pages share the same VEmployees VO instance, so when we go from the table to the detail form we are going to see the details of the currently selected employee. This is a standard and a very common approach.

So, let's play with this environment a little bit an consider three simple use cases.

Use Case #1. The table contains all the attributes the detail form has:


In this case everything is pretty clear. The VO retrieves all the required attributes with the following query:

SELECT Employees.EMPLOYEE_ID,
                Employees.FIRST_NAME,  
                Employees.LAST_NAME,
                Employees.DEPARTMENT_ID,
                Departments.DEPARTMENT_NAME,
                Departments.DEPARTMENT_ID AS DEPARTMENT_ID1
FROM EMPLOYEES Employees, DEPARTMENTS Departments
WHERE Employees.DEPARTMENT_ID = Departments.DEPARTMENT_ID

So, when we go from the table to the detail form all attributes of the VO current row are already populated and nothing extra happens.

Use Case #2. The table doesn't contain the DepartmentName but it contains the DepartmentId1 attribute which is the primary key of the Departments entity.


In this case the SQL query looks like this:

SELECT Employees.EMPLOYEE_ID,
                Employees.FIRST_NAME,  
                Employees.LAST_NAME,
                Employees.DEPARTMENT_ID,
                Departments.DEPARTMENT_ID AS DEPARTMENT_ID1
FROM EMPLOYEES Employees, DEPARTMENTS Departments
WHERE Employees.DEPARTMENT_ID = Departments.DEPARTMENT_ID

So, the DepartmentName has not been selected. However, the department entities have been created and they are stored in the entity cache. But those entities have only one populated attribute DepartmentId. The rest of the attributes in those entities are empty. When we go from the table to the detail form the framework runs into a problem since the DepartmentName attribute of the current VO row is not populated and it forces the entity instance to retrieve itself form the database. And the entity instance fires the following query in order to populate all the attributes it has:

SELECT DEPARTMENT_ID,
               DEPARTMENT_NAME,
               MANAGER_ID,
               LOCATION_ID
FROM DEPARTMENTS Departments WHERE DEPARTMENT_ID=:ID

Use Case #3. The table contains only employees attributes.


In this case the VO executes the following query:

SELECT Employees.EMPLOYEE_ID,
               Employees.FIRST_NAME,  
               Employees.LAST_NAME,
               Employees.DEPARTMENT_ID
 FROM EMPLOYEES Employee

So, there is no Departments in the from clause and as a result of the VO execution there is no any Departments entities created. When we go to the detail form the framework just can't force an entity instance to retrieve the DepartmentName from the database. Because that instance doesn't exist.
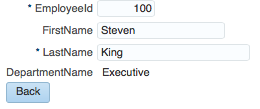
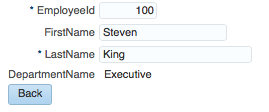
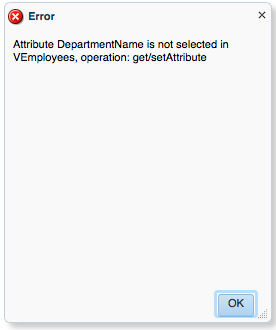
Therefore, the detail form contains a blank DepartmentName attribute. Furthermore, in 12c we are going to get an exception in such case:


Actually this is that pitfall that I mentioned at the very beginning of this post. In order to fix the issue in this use case we can add the DepartmentId1 attribute to the tree binding definition of the table:

<tree IterBinding="VEmployeesIterator" id="VEmployees">
  <nodeDefinition
       DefName="com.adfpractice.blog.declarativemodeexample.model.VEmployees"
       Name="VEmployees0">
    <AttrNames>
      <Item Value="EmployeeId"/>
      <Item Value="FirstName"/>
      <Item Value="LastName"/>
      <Item Value="DepartmentId"/>
      <Item Value="DepartmentId1"/>
    </AttrNames>
  </nodeDefinition>
</tree>
This will get the framework to execute the query like in the Use Case #2.
The second option is to set up "Selected in Query" on the DepartmentId1 attribute in the VO definition. This will force the framework to always include the attribute in the Select clause and always include Departments entity in the From clause.

That's it!