Showing posts with label Fn. Show all posts

22 Feb 2019

Conversational UI with Oracle Digital Assistant and Fn Project. Part III. Moving to the cloud.

In this post I am going to continue the story of implementing a conversational UI for FlexDeploy on top of Oracle Digital Assistant and Fn Project. Today I am going to move the serverless API working around my chatbot to the cloud, so the entire solution is working in the cloud:


The API is implemented as a set of Fn functions collected into an Fn application. The beauty of Fn is that it's just a bunch of Docker containers that can equally run on your laptop on your local Docker engine and somewhere in the cloud. Having said that I can run my Fn application on a K8s cluster from any cloud provider as it is described here. But today is not that day. Today I am going to run my serverless API on a brand new cloud service Oracle Functions which is built on top of Fn. The service is not general available yet, but I participate in the Limited Availability program so I have a trial access to it, I can play with it and blog about it. In this solution I had to get rid of the Fn Flow implemented here and get back to my original implementation as Fn Flow is not supported by Oracle Functions yet. I hope it will be soon as this is actually the best part.

So, having our OCI environment configured and having Oracle Functions service up and running (I am not reposting Oracle tutorial on that here), we need to configure our Fn CLI to be able to communicate with the service:
fn create context oracle_fn --provider oracle 
fn use context oracle_fn
fn update context oracle.compartment-id MY_COMPARTMENT_ID
fn update context api-url https://functions.us-phoenix-1.oraclecloud.com
fn update context registry phx.ocir.io/flexagonoraclecloud/flexagon-repo
fn update context oracle.profile oracle_fn

Ok, so now our Fn command line interface is talking to Oracle Functions. The next step is to create an application in the Oracle Functions console:


Now we can deploy the Fn application to Oracle Functions:
Eugenes-MacBook-Pro-3:fn fedor$ ls -l
total 8
-rw-r--r--@ 1 fedor  staff   12 Dec  4 15:41 app.yaml
drwxr-xr-x  5 fedor  staff  160 Feb  9 15:24 createsnapshotfn
drwxr-xr-x  6 fedor  staff  192 Feb  9 15:25 receiveFromBotFn
drwxr-xr-x  6 fedor  staff  192 Feb  9 15:25 sendToBotFn
Eugenes-MacBook-Pro-3:fn fedor$ 
Eugenes-MacBook-Pro-3:fn fedor$ fn deploy --all 
Having done that we can observe the application in the Oracle Functions console:


The next step is to update API urls in the chatbot and on my laptop so the functions in the cloud are invoked instead of the previous local implementation. The urls can be retrieved with the following command:
fn list triggers odaapp
So far the migration from my laptop to Oracle Functions has been looking pretty nice and easy. But here is a little of pain. In order to invoke functions hosted in Oracle Functions with http requests, the requests should be signed so they can pass through the authentication. A node.js implementation of invoking a signed function call looks like this:
var fs = require('fs');
var https = require('https');
var os = require('os');
var httpSignature = require('http-signature');
var jsSHA = require("jssha");

var tenancyId = "ocid1.tenancy.oc1..aaaaaaaayonz5yhpr4vxqpbdof5rn7x5pfrlgjwjycwxasf4dkexiq";
var authUserId = "ocid1.user.oc1..aaaaaaaava2e3wd3cu6lew2sktd6by5hnz3d7prpgjho4oambterba";
var keyFingerprint = "88:3e:71:bb:a5:ea:68:b7:56:fa:3e:5d:ea:45:60:10";
var privateKeyPath = "/Users/fedor/.oci/functions_open.pem";
var privateKey = fs.readFileSync(privateKeyPath, 'ascii');
var identityDomain = "identity.us-ashburn-1.oraclecloud.com";


function sign(request, options) {
    var apiKeyId = options.tenancyId + "/" + options.userId + "/" + options.keyFingerprint;

    var headersToSign = [
        "host",
        "date",
        "(request-target)"
    ];

    var methodsThatRequireExtraHeaders = ["POST", "PUT"];

    if(methodsThatRequireExtraHeaders.indexOf(request.method.toUpperCase()) !== -1) {
        options.body = options.body || "";
        var shaObj = new jsSHA("SHA-256", "TEXT");
        shaObj.update(options.body);

        request.setHeader("Content-Length", options.body.length);
        request.setHeader("x-content-sha256", shaObj.getHash('B64'));

        headersToSign = headersToSign.concat([
            "content-type",
            "content-length",
            "x-content-sha256"
        ]);
    }


    httpSignature.sign(request, {
        key: options.privateKey,
        keyId: apiKeyId,
        headers: headersToSign
    });

    var newAuthHeaderValue = request.getHeader("Authorization").replace("Signature ", "Signature version=\"1\",");
    request.setHeader("Authorization", newAuthHeaderValue);
}


function handleRequest(callback) {

    return function(response) {
        var responseBody = "";
        response.on('data', function(chunk) {
        responseBody += chunk;
    });


        response.on('end', function() {
            callback(JSON.parse(responseBody));
        });
    }
}


function createSnapshot(release) {

    var body = release;

    var options = {
        host: 'af4qyj7yhva.us-phoenix-1.functions.oci.oraclecloud.com',
        path: '/t/createsnapshotfn',
        method: 'POST',
        headers: {
            "Content-Type": "application/text",
        }
    };


    var request = https.request(options, handleRequest(function(data) {
        console.log(data);
    }));


    sign(request, {
        body: body,
        privateKey: privateKey,
        keyFingerprint: keyFingerprint,
        tenancyId: tenancyId,
        userId: authUserId
    });

    request.end(body);
};

This approach should be used by Oracle Digital Assistant custom components and by the listener component on my laptop while invoking the serverless API hosted in Oracle Functions.


That's it!

31 Dec 2018

Conversational UI with Oracle Digital Assistant and Fn Project. Part II

In my previous post I implemented a conversational UI for FlexDeploy with Oracle Digital Assistant. Today I am going to enrich it with Fn Flow so that the chatbot accepts release name instead of id to create a snapshot. Having done that the conversation will sound more natural:

...
"Can you build a snapshot?" I asked.
"Sure, what release are you thinking of?"
"Olympics release"
"Created a snapshot for release Olympics" she reported.
...


The chatbot invokes Fn Flow passing the release name to it as an input. The flow invokes an Fn function to get id of the given release and then it invokes an Fn function calling FlexDeploy Rest API with that id.


So the createSnapshotFlow orchestrates two Fn functions in a chain. The one getting release id for the given name with FlexDeploy REST API:
fdk.handle(function (input) {
  var res = request('GET', fd_url + '/flexdeploy/rest/v1/release?releaseName=' + input, {
  });


  return JSON.parse(res.getBody('utf8'))[0].releaseId;
})

And the one creating a snapshot for the release id with the same API

fdk.handle(function (input) {
  var res = request('POST', fd_url + '/flexdeploy/rest/v1/releases/'+input+'/snapshot', {
    json: { action: 'createSnapshot' },
  });


  return JSON.parse(res.getBody('utf8'));
})

The core piece of this approach is Fn Flow. The Java code of createSnapshotFlow looks like this:

public class CreateSnapshotFlow {


 public byte[] createSnapshot(String input) {
   Flow flow = Flows.currentFlow();

    FlowFuture<byte[]> stage = flow
      //invoke checkreleasefn
      .invokeFunction("01D14PNT7ZNG8G00GZJ000000D", HttpMethod.POST,
                      Headers.emptyHeaders(), input.getBytes())
      .thenApply(HttpResponse::getBodyAsBytes)
      .thenCompose(releaseId -> flow.
                      //invoke createsnapshotfn
                     invokeFunction("01CXRE2PBANG8G00GZJ0000001", HttpMethod.POST,
                                    Headers.emptyHeaders(), releaseId))
      .thenApply(HttpResponse::getBodyAsBytes);

    return stage.get();
 }


Note, that the flow operates with function ids rather than function names. The list of all application functions with their ids can be retrieved with this command line:


Where odaapp is my Fn application.

That's it!

30 Nov 2018

Conversational UI with Oracle Digital Assistant and Fn Project

Here and there we see numerous predictions that pretty soon chatbots will play a key role in the communication between the users and their systems. I don't have a crystal ball and I don't want to wait for this "pretty soon", so I decided to make these prophecies come true now and see what it looks like.

A flagman product of the company I am working for is FlexDeploy which is a fully automated DevOps solutions. One of the most popular activities in FlexDeploy is creating a release snapshot that actually builds all deployable artifacts and deploys them across environments with a pipeline.
So, I decided to have some fun over the weekend and implemented a conversational UI for this operation where I am able to talk to FlexDeploy. Literally. At the end of my work my family saw me talking to my laptop and they could hear something like that:

  "Calypso!" I said.
  "Hi, how can I help you?" was the answer.
  "Not sure" I tested her.
  "You gotta be kidding me!" she got it.
  "Can you build a snapshot?" I asked.
  "Sure, what release are you thinking of?"
  "1001"
  "Created a snapshot for release 1001" she reported.
  "Thank you" 
  "Have a nice day" she said with relief.

So,  basically, I was going to implement the following diagram:


As a core component of my UI I used a brand new Oracle product Oracle Digital Assistant. I built a new skill capable of basic chatting and implemented a new custom component so my bot was able to invoke an http request to have the backend system create a snapshot.  The export of the skill FlexDeployBot along with Node.js source code of the custom component custombotcomponent is available on GitHub repo for this post.
I used my MacBook as a communication device capable of listening and speaking and I defined a webhook  channel for my bot so I can send messages to it and get callbacks with responses.

It looks simple and nice on the diagram above. The only thing is that I wanted to decouple the brain, my chatbot, from the details of the communication device and from the details of the installation/version of my back-end system FlexDeploy. I needed an intermediate API layer, a buffer, something to put between ODA and the outer world. It looks like Serverless Functions is a perfect fit for this job.


As a serverless platform I used Fn Project. The beauty of it is that it's a container-native serverless platform, totally based on Docker containers and it can be easily run locally on my laptop (what I did for this post) or somewhere in the cloud, let's say on Oracle Kubernetes Engine.

Ok, let's get into the implementation details from left to right of the diagram.


So, the listener component, the ears, the one which recognizes my speech and converts it into text is implemented with Python:

The key code snippet of the component look like this (the full source code is available on GitHub):
r = sr.Recognizer()
mic = sr.Microphone()

with mic as source:
    r.energy_threshold = 2000

while True:  
    try:
        with mic as source: 
            audio = r.listen(source, phrase_time_limit=5)           
            transcript = r.recognize_google(audio)
            print(transcript)
            if active:
                requests.post(url = URL, data = transcript)
                time.sleep(5)
           
    except sr.UnknownValueError:
        print("Sorry, I don't understand you")

Why Python? There are plenty of available speech recognition libraries for Python, so you can play with them and choose the one which understands your accent better. I like Python.
So, once the listener recognizes my speech it invokes an Fn function passing the phrase as a request body.
The function sendToBotFn is implemented with Node.js:
function buildSignatureHeader(buf, channelSecretKey) {
    return 'sha256=' + buildSignature(buf, channelSecretKey);
}


function buildSignature(buf, channelSecretKey) {
   const hmac = crypto.createHmac('sha256', Buffer.from(channelSecretKey, 'utf8'));
   hmac.update(buf);
   return hmac.digest('hex');
}


function performRequest(headers, data) {
  var dataString = JSON.stringify(data);
 
  var options = {
   body: dataString,   
   headers: headers
  };
       
  request('POST', host+endpoint, options);             
}


function sendMessage(message) {
  let messagePayload = {
   type: 'text',
   text: message
  }

  let messageToBot = {
    userId: userId,
    messagePayload: messagePayload
  }

  let body = Buffer.from(JSON.stringify(messageToBot), 'utf8');
  let headers = {};
  headers['Content-Type'] = 'application/json; charset=utf-8';
  headers['X-Hub-Signature'] = buildSignatureHeader(body, channelKey);

  performRequest(headers, messageToBot);  
}


fdk.handle(function(input){ 
  sendMessage(input); 
  return input; 
})

Why Node.js? It's not because I like it. No. It's because Oracle documentation on implementing a custom web hook channel is referring to Node.js. They like it.

When the chatbot is responding it is invoking a webhook referring to an Fn function receiveFromBotFn running on my laptop.  I use ngrok tunnel to expose my Fn application listening to localhost:8080 to the Internet. The receiveFromBotFn function is also implemented with Node.js:
const fdk=require('@fnproject/fdk');
const request = require('sync-request');
const url = 'http://localhost:4390';
fdk.handle(function(input){  
    var sayItCall = request('POST', url,{
     body: input.messagePayload.text,
    });
  return input;
})
 
The function sends an http request to a simple web server running locally and listening to 4390 port.
I have to admit that it's really easy to implement stuff like that with Node.js. The web server uses Mac OS X native utility say to pronounce whatever comes in the request body:
var http = require('http');
const exec = require("child_process").exec
const request = require('sync-request');

http.createServer(function (req, res) {
      let body = '';
      req.on('data', chunk => {
          body += chunk.toString();
      });

      req.on('end', () => {       
          exec('say '+body, (error, stdout, stderr) => {
      });       
      res.end('ok');
     });

  res.end();

}).listen(4390);
In order to actually invoke the back-end to create a snapshot with FlexDeploy the chatbot invokes with the custombotcomponent an Fn function createSnapshotFn:
fdk.handle(function(input){
   
var res=request('POST',fd_url+'/flexdeploy/rest/v1/releases/'+input+'/snapshot',  {
      json: {action : 'createSnapshot'},
  });

  return JSON.parse(res.getBody('utf8'));
})

The function is simple, it just invokes FlexDeploy REST API to start building a snapshot for the given release. It is also implemented with Node.js, however I am going to rewrite it with Java. I love Java. Furthermore, instead of a simple function I am going to implement an Fn Flow that first checks if the given release exists and if it is valid and only after that it invokes the createSnapshotFn function for that release. In the next post.


That's it!


31 Mar 2018

Deploying to K8s cluster with Fn Function

An essential step of any CI/CD pipeline is deployment. If the pipeline operates with Docker containers and deploys to K8s clusters then the goal of the deployment step is to deploy a specific Docker image (stored on some container registry) to a specific K8s cluster.  Let's say there is a VM where this deployment step is being performed. There are a couple of things to be done with that VM before it can be used as a deploying-to-kuberenetes machine:
  • install kubectl (K8s CLI) 
  • configure access to K8s clusters where we are going to deploy 
Having the VM configured, the deployment step does the following:
# kubeconfig file contains access configuration to all K8s clusters we need
# each configuration is called "context"
export KUBECONFIG=kubeconfig

# switch to "google-cloud-k8s-dev" context (K8s cluster on Google Cloud for Dev)
# so all subsequent kubectl commands are applied to that K8s cluster
kubectl config  use-context google-cloud-k8s-dev

# actually deploy by applying k8s-deployment.yaml file
# containing instructions on what image should be deployed and how  
kubectl apply -f k8s-deployment.yaml

In this post I am going to show how we can create a preconfigured Docker container capable of deploying a Docker image to a K8s cluster. So, basically, it is going to work as a function with two parameters: docker image, K8s context. Therefore we are going to create a function in Fn Project basing on this "deployer" container and deploy to K8s just by invoking the function over http.

The deployer container is going to be built from a Dockerfile with the following content:
FROM ubuntu

# install kubectl
ADD https://storage.googleapis.com/kubernetes-release/release/v1.6.4/bin/linux/amd64/kubectl /usr/local/bin/kubectl
ENV HOME=/config
RUN chmod +x /usr/local/bin/kubectl
RUN export PATH=$PATH:/usr/local/bin

# install rpl
RUN apt-get update
RUN apt-get install rpl -y

# copy into container k8s configuration file with access to all K8s clusters
COPY kubeconfig kubeconfig

# copy into container yaml file template with IMAGE_NAME placeholder
# and an instruction on how to deploy the container to K8s cluster
COPY k8s-deployment.yaml k8s-deployment.yaml

# copy into container a shell script performing the deployment
COPY deploy.sh /usr/local/bin/deploy.sh
RUN chmod +x /usr/local/bin/deploy.sh

ENTRYPOINT ["xargs","/usr/local/bin/deploy.sh"]

It is worth looking at the k8s-deployment.yaml file. It contains IMAGE_NAME placeholder which is going to be replaced with the exact Docker image name while deployment:

apiVersion: extensions/v1beta1
kind: Deployment

...

    spec:
      containers:
      - image: IMAGE_NAME
        imagePullPolicy: Always
...

The deploy.sh script which is being invoked once the container is started has the following content:
#!/bin/bash

# replace IMAGE_NAME placeholder in yaml file with the first shell parameter 
rpl IMAGE_NAME $1 k8s-deployment.yaml

export KUBECONFIG=kubeconfig

# switch to K8s context specified in the second shell parameter
kubectl config  use-context $2

# deploy to K8s cluster
kubectl apply -f k8s-deployment.yaml

So, we are going to build a docker image from the Dockerfile by invoking this docker command:
docker build -t efedorenko/k8sdeployer:1.0 .
Assuming there is Fn Project up and running somewhere (e.g. on K8s cluster as it is described in this post) we can create an Fn application:
fn apps create k8sdeployerapp
Then create a route to the k8sdeployer container:
fn routes create k8sdeployerapp /deploy efedorenko/k8sdeployer:1.0
We have created a function deploying a Docker image to a K8s cluster. This function can be invoked over http like this:
curl http://35.225.120.28:80/r/k8sdeployer -d "google-cloud-k8s-dev efedorenko/happyeaster:latest"
This call will deploy efedorenko/happyeaster:latest Docker image to a K8s cluster on Google Cloud Platform.


That's it!


24 Mar 2018

Run Fn Functions on K8s on Google Cloud Platform

Recently, I have been playing a lot with Functions and Project Fn. Eventually, I got to the point where I had to go beyond a playground on my laptop and go to the real wild world. An idea of running Fn on a K8s cluster seemed very attractive to me and I decided to do that somewhere on prem or in the cloud.  After doing some research on how to install and configure K8s cluster on your own on a bare metal I came to a conclusion that I was too lazy for that. So, I went (flew) to the cloud.

In this post I am going to show how to run Fn on Kubernetes cluster hosted on the Google Cloud Platform. Why Google? There are plenty of other cloud providers with the K8s services.
The thing is that Google really has Kubernetes cluster in the cloud which is available for everyone. They give you the service right away without asking to apply for a preview mode access (aka we'll reach out to you once we find you good enough for that), explaining why you need it, checking your background, credit history, etc. So, Google.

Once you got through all formalities and finally have access to the Google Kubernetes Engine, go to the Quickstarts page and follow the instructions to install Google Cloud SDK.

If you don't have kubectl installed on your machine you can install it with gcloud:
gcloud components install kubectl

Follow the instructions on Kubernetes Engine Quickstart to configure gcloud and create a K8s cluster by invoking the following commands:
gcloud container clusters create fncluster
gcloud container clusters get-credentials fncluster
Check the result with kubectl:
kubectl cluster-info
This will give you a list of K8s services in your cluster and their URLs.

Ok, so this is our starting point. We have a new K8s cluster in the cloud on one hand and Fn project on another hand. Let's get them married.

We need to install a tool managing Kubernetes packages (charts). Something similar to apt/yum/dnf/pkg on Linux. The tool is Helm. Since I am a happy Mac user I just did that:
brew install kubernetes-helm

The rest of Helm installation options are available here.

The next step is to install Tiller in the K8s cluster. This is a server part of Helm:
kubectl create serviceaccount --namespace kube-system tiller
kubectl create clusterrolebinding tiller-cluster-rule --clusterrole=cluster-admin --serviceaccount=kube-system:tiller
helm init --service-account tiller --upgrade

If you don't have Fn installed locally, you will want to install it so you have Fn CLI on your machine (on Mac or Linux):  

curl -LSs https://raw.githubusercontent.com/fnproject/cli/master/install > setup.sh
chmod u+x setup.sh
sudo ./setup.sh

Install Fn on K8s cluster with Helm (assuming you do have git client):
git clone git@github.com:fnproject/fn-helm.git && cd fn-helm
helm dep build fn
helm install --name fn-release fn

Wait (a couple of minutes) until Google Kubernetes Engine assigns an external IP to the Fn API in the cluster. Check it with:
kubectl get svc --namespace default -w fn-release-fn-api

Configure your local Fn client with access to Fn running on K8s cluster
export FN_API_URL=http://$(kubectl get svc --namespace default fn-release-fn-api -o jsonpath='{.status.loadBalancer.ingress[0].ip}'):80

Basically, it's done. Let's check it:
  fn apps create adfbuilderapp 
  fn apps list

Now we can build ADF applications with an Fn function as it is described in my previous post. Only this time the function will run and therefore building job will be performed somewhere high in the cloud.


That's it!

31 Jan 2018

Fn Function to build an Oracle ADF application

In one of my previous posts I described how to create a Docker container serving as a builder machine for ADF applications. Here I am going to show how to use this container as a function on Fn platform.

First of all let's update the container so that it meets requirements of a function, meaning that it can be invoked as a runnable binary accepting some arguments. In an empty folder I have created a Dockerfile (just a simple text file with this name) with the following content:

FROM efedorenko/adfbuilder
ENTRYPOINT ["xargs","mvn","package","-DoracleHome=/opt/Oracle_Home","-f"]

This file contains instructions for Docker on how to create a new Docker image out of existing one (efedorenko/adfbuilder from the previous post) and specifies an entry point, so that a container knows what to do once it has been initiated by the Docker run command. In this case whenever we run a container it executes Maven package goal for the pom file with the name fetched from stdin. This is important as Fn platform uses stdin/stdout for functions input/output as a standard approach.

In the same folder let's execute a command to build a new Docker image (fn_adfbuilder) out of our Docker file:

docker build -t efedorenko/fn_adfbuilder .

Now, if we run the container passing pom file name through stdin like this:

echo -n "/opt/MySampleApp/pom.xml" | docker run -i --rm efedorenko/fn_adfbuilder

The container will execute inside itself what we actually need:

mvn package -DoracleHome=/opt/Oracle_Home -f /opt/MySampleApp/pom.xml

Basically, having done that, we got a container acting as a function. It builds an application for the given pom file.

Let's use this function in Fn platform. The installation of Fn on your local machine is as easy as invoking a single command and described on GitHub Fn project page.  Once Fn is installed we can specify Docker registry where we store images of our functions-containers and start Fn server:

export FN_REGISTRY=efedorenko 
fn start

The next step is to create an Fn application which is going to use our awesome function:

fn apps create adfbuilderapp

For this newly created app we have to specify a route to our function-confiner, so that the application knows when and how to invoke it:

fn routes create --memory 1024 --timeout 3600 --type async adfbuilderapp /build efedorenko/fn_adfbuilder:latest

We have created a route saying that whenever /build resource is requested for adfbuilderapp, Fn platform should create a new Docker container basing on the latest version of fn_adfbuilder image from  efedorenko repository and run it granting with 1GB of memory and passing arguments to stdin (the default mode). Furthermore, since the building is a time/resource consuming job, we're going to invoke the function in async mode with an hour timeout.  Having the route created we are able to invoke the function with Fn Cli:

echo -n "/opt/MySampleApp/pom.xml" | fn call adfbuilderapp /build

or over http:

curl -d "/opt/MySampleApp/pom.xml" http://localhost:8080/r/adfbuilderapp/build

In both cases the platform will put the call in a queue (since it is async) and return the call id:

{"call_id":"01C5EJSJC847WK400000000000"}


The function is working now and we can check how it is going in a number of different ways. Since function invocation is just creating and running a Docker container, we can see it by getting a list of all running containers:


docker ps 

CONTAINER ID        IMAGE                               CREATED             STATUS                NAMES

6e69a067b714        efedorenko/fn_adfbuilder:latest     3 seconds ago       Up 2 seconds          01C5EJSJC847WK400000000000
e957cc54b638        fnproject/ui                        21 hours ago        Up 21 hours           clever_turing
68940f3f0136        fnproject/fnserver                  27 hours ago        Up 27 hours           fnserver


Fn has created a new container and used function call id as its name. We can attach our stdin/stdout to the container and see what is happening inside:

docker attach 01C5EJSJC847WK400000000000

Once the function has executed we can use Fn Rest API (or Fn Cli) to request information about the call:

http://localhost:8080/v1/apps/adfbuilderapp/calls/01C5EJSJC847WK400000000000

{"message":"Successfully loaded call","call":{"id":"01C5EJSJC847WK400000000000","status":"success","app_name":"adfbuilderapp","path":"/build","completed_at":"2018-02-03T19:52:33.204Z","created_at":"2018-02-03T19:46:56.071Z","started_at":"2018-02-03T19:46:57.050Z","stats":[{"timestamp":"2018-02-03T19:46:58.189Z","metrics":
....


http://localhost:8080/v1/apps/adfbuilderapp/calls/01C5EJSJC847WK400000000000/log


{"message":"Successfully loaded log","log":{"call_id":"01C5EKA5Y747WK600000000000","log":"[INFO] Scanning for projects...\n[INFO] ------------------------------------------------------------------------\n[INFO] Reactor Build Order:\n[INFO] \n[INFO] Model\n[INFO] ViewController\n[INFO]
....


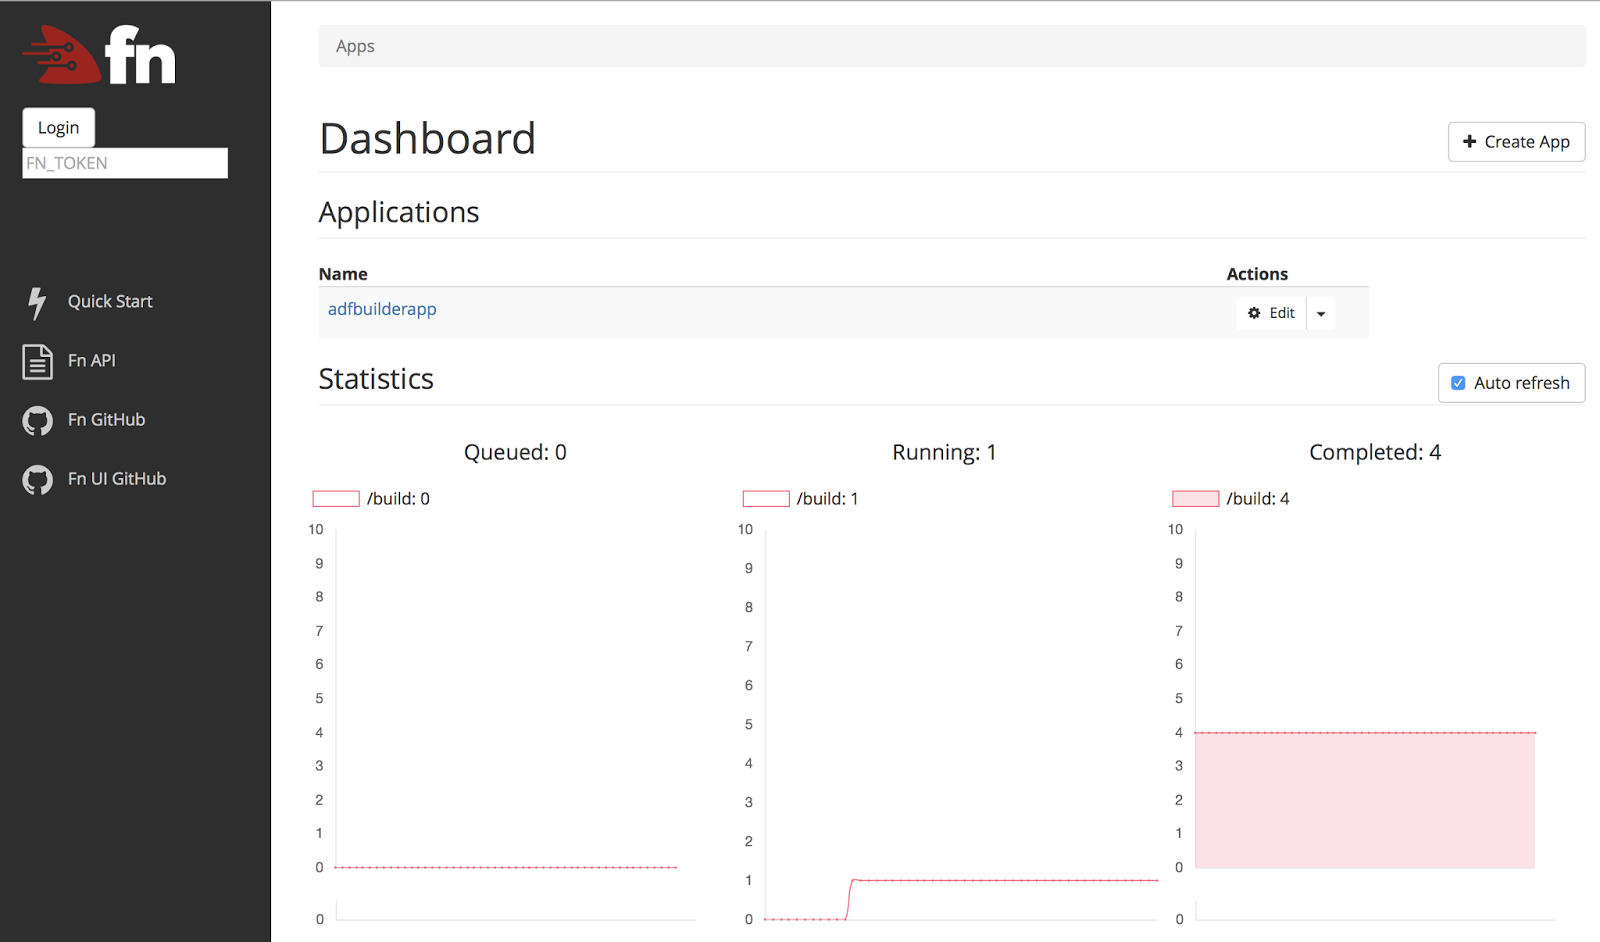
We can also monitor function calls in a fancy way by using Fn UI dashboard:


The result of our work is a function that builds ADF applications. The beauty of it is that the consumer of the function, the caller, just uses Rest API over http to get the application built and the caller does not care how and where this job will be done. But the caller knows for sure that computing resources will be utilized no longer than it is needed to get the job done.

Next time we'll try to orchestrate the function in Fn Flow.

That's it!